Learn Docker, from the beginning, part II

Follow me on Twitter, happy to take your suggestions on topics or improvements /Chris
This article is part of a series:
- Docker — from the beginning part I, This covers why Docker and the basic concepts such containers, images and Dockerfile and of course the commands you need to manage them.
- Docker — from the beginning, Part II, we are here
- Docker — from the beginning, Part III, this is about how to deal with Databases, putting them into containers and how to make containers talk to other containers using legacy linking but also the new standard through networks
- Docker — from the beginning, Part IV, Part IV, this is how we manage more than one service using Docker Compose ( this is 1/2 part on Docker Compose)
- Docker - from the beginning, Part V, this part is the second and concluding part on Docker Compose where we cover Volumes, Environment Variables and working with Databases and Networks
Welcome to the second part of this series about Docker. Hopefully, you have read the first part to gain some basic understanding of Dockers core concepts and its basic commands or you have acquired that knowledge elsewhere.
In this article, we will attempt to cover the following topics
- recap and problem introduction , let’s recap on the lessons learned from part I and let’s try to describe how not using a volume can be quite painful
- persist data , we can use Volumes to persist files we create or Databases that we change ( e.g Sqllite).
- turning our workdir into a volume , Volumes also give us a great way to work with our application without having to set up and tear down the container for every change.
Resources
Using Docker and containerization is about breaking apart a monolith into microservices. Throughout this series, we will learn to master Docker and all its commands. Sooner or later you will want to take your containers to a production environment. That environment is usually the Cloud. When you feel you've got enough Docker experience have a look at these links to see how Docker can be used in the Cloud as well:
- Containers in the Cloud Great overview page that shows what else there is to know about containers in the Cloud
- Deploying your containers in the Cloud Tutorial that shows how easy it is to leverage your existing Docker skill and get your services running in the Cloud
- Creating a container registry Your Docker images can be in Docker Hub but also in a Container Registry in the Cloud. Wouldn't it be great to store your images somewhere and actually be able to create a service from that Registry in a matter of minutes?
Recap and the problem of not using a volume
Ok, so we will keep working on the application we created in the first part of this series, that is a Node.js application with the library express installed.
We will do the following in this section:
- run a container, we will start a container and thereby repeat some basic Docker commands we learned in the first part of this series
- update our app, update our source code and start and stop a container and realize why this way of working is quite painful
Run a container
As our application grows we might want to do add routes to it or change what is rendered on a specific route. Let’s show the source code we have so far:
// app.js

const express = require('express')

const app = express()

const port = process.env.PORT

app.get('/', (req, res) => res.send('Hello World!'))

app.listen(port, () => console.log(`Example app listening on port ${port}!`))
2
3
4
5
6
7
8
9
10
11
Now let’s see if we remember our basic commands. Let’s type:
docker ps

Ok, that looks empty. So we cleaned up last time with docker stop or docker kill , regardless of what we used we don’t have a container that we can start, so we need to build one. Let’s have a look at what images we have:
docker images

Ok, so we have our image there, let’s create and run a container:
docker run -d -p 8000:3000 chrisnoring/node
That should lead to a container up and running at port 8000 and it should run in detached mode, thanks to us specifying the -d flag.

We get a container ID above, good. Let’s see if we can find our application at http://localhost:8000:
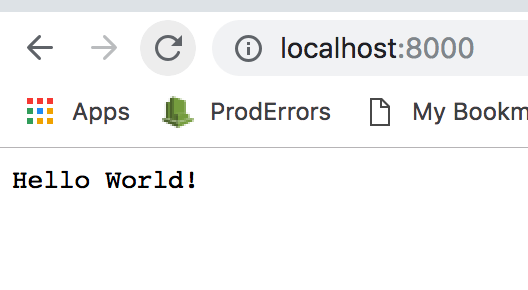
Ok, good there it is. Now we are ready for the next step which is to update our source code.
Update our app
Let’s start by changing the default route to render out hello Chris , that is add the following line:
app.get('/', (req, res) => res.send('Hello Chris!'))
Ok, so we save our change and we head back to the browser and we notice it is still saying Hello World. It seems the container is not reflecting our changes. For that to happen we need to bring down the container, remove it, rebuild the image and then run the container again. Because we need to carry out a whole host of commands, we will need to change how we build and run our container namely by actively giving it a name, so instead of running the container like so:
docker run -d -p 8000:3000 chrisnoring/node
We now type:
docker run -d -p 8000:3000 --name my-container chrisnoring/node
This means our container will get the name my-container and it also means that when we refer to our container we can now use its name instead of its container ID, which for our scenario is better as the container ID will change for every setup and tear down.
docker stop my-container // this will stop the container, it can still be started if we want to

docker rm my-container // this will remove the container completely

docker build -t chrisnoring/node . // creates an image

docker run -d -p 8000:3000 --name my-container chrisnoring/node
2
3
4
5
6
7
You can chain these commands to look like this:
docker stop my-container && docker rm my-container && docker build -t chrisnoring/node . && docker run -d -p 8000:3000 --name my-container chrisnoring/node
My first seeing thought seeing that is WOW, that’s a lot of commands. There has got to be a better way right, especially when I’m in the development phase?

Well yes, there is a better way, using a volume. So let’s look at volumes next.
Using a volume
Volumes or data volumes is a way for us to create a place in the host machine where we can write files so they are persisted. Why would we want that? Well, when we are under development we might need to put the application in a certain state so we don’t have to start from the beginning. Typically we would want to store things like log files, JSON files and perhaps even databases (SQLite ) on a volume.
It’s quite easy to create a volume and we can do so in many different ways, but mainly there are two ways:
- before you create a container
- lazily, e.g while creating the container
Creating and managing a volume
To create a volume you type the following:
docker volume create [name of volume]
we can verify that our volume was created by typing:
docker volume ls

This will list all the different volumes we have. Now, this will after a while lead to you having tons of volumes created so it’s good to know how to keep down the number of volumes. For that you can type:
docker volume prune
This will remove all the volumes you currently are not using. You will be given a question if you want to proceed.

If you want to remove a single volume you can do so by typing:
docker volume rm [name of volume]
Another command you most likely will want to know about is the inspect command that allows us to see more details on our created volume and probably most important where it will place the persisted files.
docker inspect [name of volume]
A comment on this though is that most of the time you might not care where Docker place these files but sometimes you would want to know due to debugging purposes. As we will see later in this section controlling where files are persisted can work to our advantage when we develop our application.
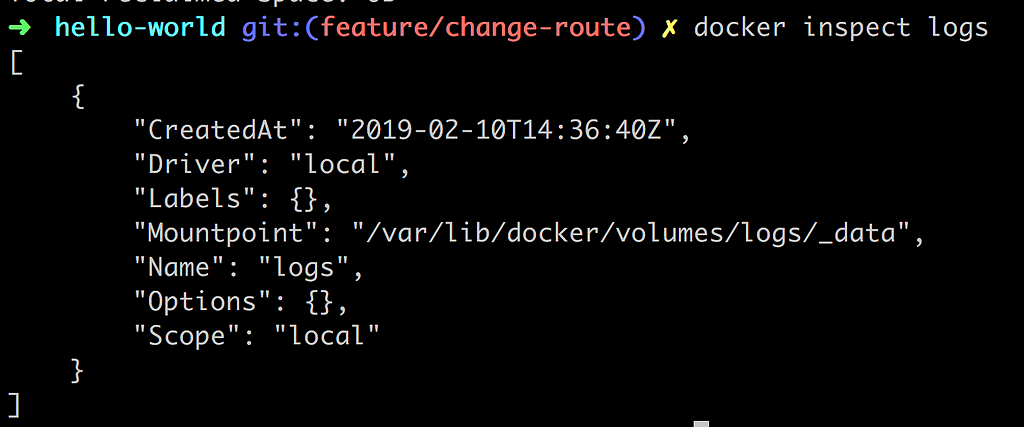
As you can see the Mountpoint field is telling us where Docker is planning to persist your files.
Mounting a volume in your application
Ok, so we have come to the point that we want to use our volume in an application. We want to be able to change or create files in our container so that when we pull it down and start it up again our changes will still be there.
For this we can use two different commands that achieve relatively the same thing with a different syntax, those are:
-v, —-volume, the syntax looks like the following -v [name of volume]:[directory in the container], for example -v my-volume:/app--mount, the syntax looks like the following--mount source=[name of volume],target=[directory in container] , for example —-mount source=my-volume,target=/app
Used in conjuncture with running a container it would look like this for example:
docker run -d -p 8000:3000 --name my-container --volume my-volume:/logs chrisnoring/node
Let’s try this out. First off let’s run our container:

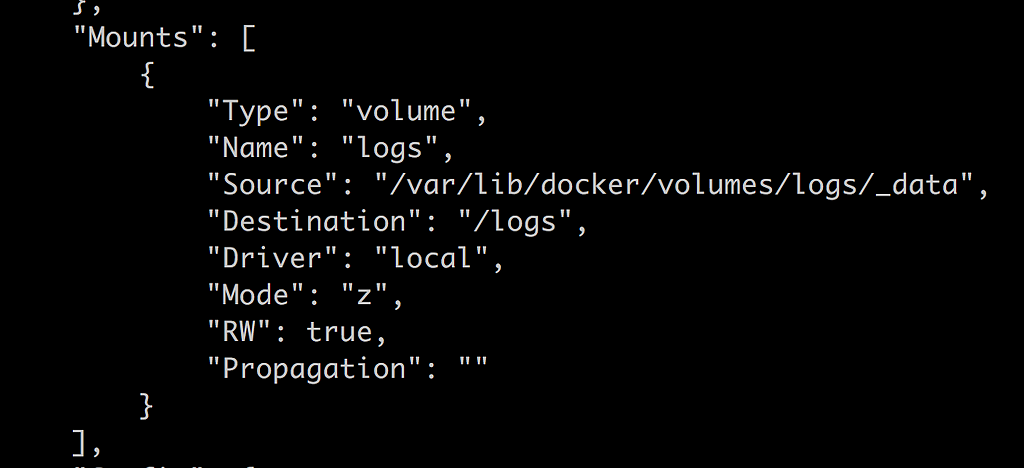
Then let’s run our inspect command to ensure our volume has been correctly mounted inside of our container. When we run said command we get a giant JSON output but we are looking for the Mounts property:
Ok, our volume is there, good. Next step is to locate our volume inside of our container. Let’s get into our container with:
docker exec -it my-container bash
and thereafter navigate to our /logs directory:
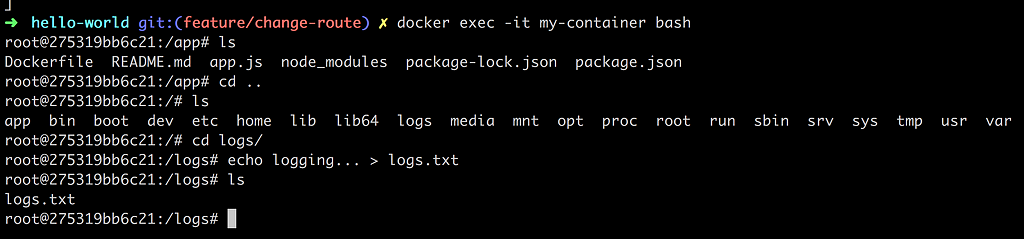
Ok, now if we bring down our container everything we created in our volume should be persisted and everything that is not placed in the volume should be gone right? Yep, that’s the idea. Good, we understand the principle of volumes.
Mounting a subdirectory as a volume
So far we have been creating a volume and have let Docker decide on where the files are being persisted. What happens if we decide where these files are persisted?
Well if we point to a directory on our hard drive it will not only look at that directory and place files there but it will pick the pre-existing files that are in there and bring them into our mount point in the container. Let’s do the following to demonstrate what I mean:
- create a directory, let’s create a directory /logs
- create a file, let’s create a file logs.txt and write some text in it
- run our container, let’s create a mount point to our local directory + /logs
The first two commands lead to us having a file structure like so:
app.js
Dockerfile
/logs
 logs.txt // contains 'logging host...'
package.json
package-lock.json
2
3
4
5
6
Now for the run command to get our container up and running:

Above we observe that our --volume command looks a bit different. The first argument is $(pwd)/logs which means our current working directory and the subdirectory logs. The second argument is /logs which means we are saying mount our host computers logs directory to a directory with the same name in the container.
Let’s dive into the container and establish that the container has indeed pulled in the files from our host computers logs directory:
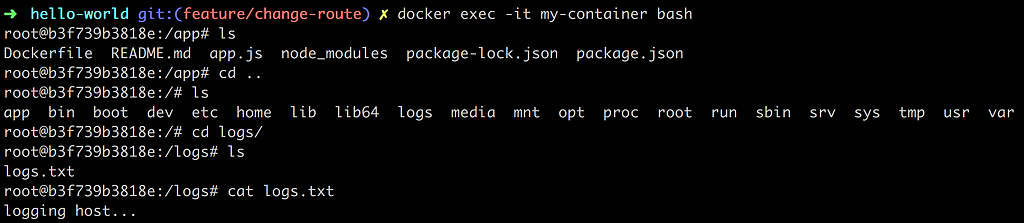
As you we can see from the above set of commands we go into the container with docker exec -it my-container bash and then we proceed to navigate ourselves to the logs directory and finally we read out the content of logs.txt with the command cat logs.txt. The result is logging host... e.g the exact file and content that we have on the host computer.
But this is a volume however which means there is a connection between the volume in the host computer and the container. Let’s edit the file next on the host computer and see what happens to the container:

Wow, it changed in the container as well without us having to tear it down or restarting it.
Treating our application as a volume
To make our whole application be treated as a volume we need to tear down the container like so:
docker kill my-container && docker rm my-container
Why do we need to do all that? Well, we are about to change the Dockerfile as well as the source code and our container won’t pick up these changes, unless we use a Volume, like I am about to show you below.
Thereafter we need to rerun our container this time with a different volume argument namely --volume $(PWD):/app.
NOTE, if your PWD consists of a directory with space in it you might need to specify the argument as
"$(PWD)":/appinstead, i.e we need to surround$(PWD)with double quotes. Thank you to Vitaly for pointing that out 😃
The full command looks like this:

This will effectively make our entire app directory a volume and every time we change something in there our container should reflect the changes.
So let’s try adding a route in our Node.js Express application like so:
app.get("/docker", (req, res) => {

  res.send("hello from docker");

});
2
3
4
5
Ok, so from what we know from dealing with the express library we should be able to reach http://localhost:8000/docker in our browser or?
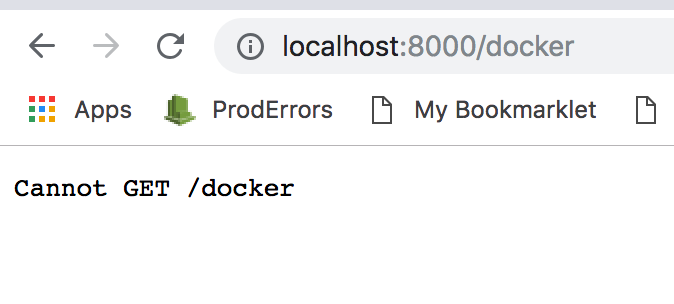
Sad face 😦. It didn’t work, what did we do wrong? Well here is the thing. If you change the source in a Node.js Express application you need to restart it. This means that we need to take a step back and think how can we restart our Node.js Express web server as soon as there is a file change. There are several ways to accomplish this like for example:
- install a library like nodemon or forever that restarts the web server
- run a PKILL command and kill the running node.js process and the run node app.js
It feels a little less cumbersome to just install a library like nodemon so let’s do that:

This means we now have another library dependency in package.json but it means we will need to change how we start our app. We need to start our app using the command nodemon app.js. This means nodemon will take care of the whole restart as soon as there is a change. While we are at it let’s add a start script to package.json, after all, that is the more Node.js -ish way of doing things:

Let's describe what we did above, in case you are new to Node.js. Adding a start script to a package.json file means we go into a section called "scripts" and we add an entry start, like so:
// excerpt package.json
"scripts": {
  "start": "nodemon app.js"
}
2
3
4
5
By default a command defined in "scripts" is run by you typing npm run [name of command]. There are however known commands, like start and test and with known commands we can omit the keyword run, so instead of typing npm run start, we can type npm start. Let's add another command "log" like so:
// excerpt package.json

"scripts": {
  "start": "nodemon app.js",
  "log": "echo \"Logging something to screen\""
}
2
3
4
5
6
To run this new command "log" we would type npm run log.
Ok, one thing remains though and that is changing the Dockerfile to change how it starts our app. We only need to change the last line from:
ENTRYPOINT ["node", "app.js"]
to
ENTRYPOINT ["npm", "start"]
Because we changed the Dockerfile this leads to us having to rebuild the image. So let’s do that:
docker build -t chrisnoring/node .
Ok, the next step is to bring up our container:
docker run -d -p 8000:3000 --name my-container --volume $(PWD):/app chrisnoring/node
Worth noting is how we expose the entire directory we are currently standing in and mapping that to /app inside the container.
Because we’ve already added the /docker route we need to add a new one, like so:
app.get('/nodemon', (req, res) => res.send('hello from nodemon'))
Now we hope that nodemon has done it’s part when we save our change in app.js :
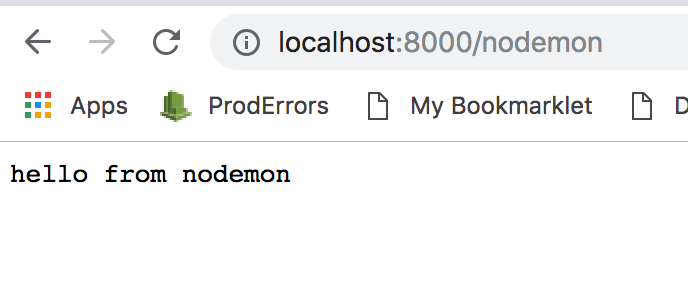
Aaaand, we have a winner. It works to route to /nodemon . I don’t know about you but the first time I got this to work this was me:

Summary
This has brought us to the end of our article. We have learned about Volumes which is quite a cool and useful feature and more importantly I’ve shown how you can turn your whole development environment into a volume and keep working on your source code without having to restart the container.
In the third part of our series, we will be covering how to work linked containers and databases. So stay tuned.
Follow me on Twitter, happy to take your suggestions on topics or improvements /Chris