Learn Docker, from the beginning, part V

Follow me on Twitter, happy to take your suggestions on topics or improvements /Chris
This article is part of a series:
Docker — from the beginning part I, this covers why Docker, the basic concepts and the commands we need to manage things like images and containers.
Docker — from the beginning, Part II, this is about Volumes and how we can use volumes to persist data but also how we can turn our development environment into a Volume and make our development experience considerably better
Docker — from the beginning, Part III, this is about how to deal with Databases, putting them into containers and how to make containers talk to other containers using legacy linking but also the new standard through networks
Docker — from the beginning, Part IV, Part IV, this is how we manage more than one service using Docker Compose ( this is 1/2 part on Docker Compose)
Docker - from the beginning, Part V, we are here
We will keep working on our project introduced in Part IV and in doing so we will showcase more Docker Compose features and essentially build out our project to cover everything you might possibly need.
In this part, we will cover:
- Environment variables , now we have covered those in previous parts so this is mostly about how we set them in Docker Compose
- Volumes , same thing with volumes, this has been covered in previous articles even though we will mention their use and how to work with them with Docker Compose
- Networks and Databases , finally we will cover Databases and Networks, this part is a bit tricky but hopefully, we managed to explain it thoroughly
If you at any point should feel confused here is the repo this article is based on:
Resources
Using Docker and containerization is about breaking apart a monolith into microservices. Throughout this series, we will learn to master Docker and all its commands. Sooner or later you will want to take your containers to a production environment. That environment is usually the Cloud. When you feel you've got enough Docker experience have a look at these links to see how Docker can be used in the Cloud as well:
- Containers in the Cloud Great overview page that shows what else there is to know about containers in the Cloud
- Deploying your containers in the Cloud Tutorial that shows how easy it is to leverage your existing Docker skill and get your services running in the Cloud
- Creating a container registry Your Docker images can be in Docker Hub but also in a Container Registry in the Cloud. Wouldn't it be great to store your images somewhere and actually be able to create a service from that Registry in a matter of minutes?
Environment variables
One of the things I’ve shown you in previous articles is how we can specify environment variables. Now variables can be set in the Dockerfile but we can definitely set them on the command line and thereby also in Docker Compose and specifically in docker-compose.yaml:
// docker-compose.yaml

version: '3'
services:
 product-service:
   build:
     context: ./product-service
   ports:
     - "8000:3000"
   environment:
     - test=testvalue
 inventory-service:
   build:
     context: ./inventory-service
   ports:
   - "8001:3000"
2
3
4
5
6
7
8
9
10
11
12
13
14
15
16
Above we are creating an environment variable by defining environment followed by -test=testvalue, which means we create the variable test with value, testvalue.
We can easily test that this works by reading from process.env.test in our app.js file for the product-service directory.
Another way to test this is to run Docker compose and query for what environment variables are available, like so:

As you can see above we first run docker-compose ps and get the containers that are part of this Docker Compose session and then we run docker exec [container name] env to list the environment variables. A third option is to run docker exec -it [container name] bash and enter the container and use bash to echo out the variable value. There are quite a few ways to manage environment variables with Docker compose so have a read in the official docs, what else you can do.
Volumes
We’ve covered volumes in an earlier part of this series and we found them to be a great way to:
- create a persistent space , this is ideal to create log files or output from a Database that we want to remain, once we tear down and run our containers
- turn our development environment into a Volume , the benefits of doing so meant that we could start up a container and then change our code and see those changes reflected without having to rebuild or tear down our container, a real time saver.
Create a persistent space
Let’s see how we can deal with Volumes in Docker compose:
// docker-compose.yml

version: '3'
services:
 product-service:
   build:
     context: ./product-service
   ports:
     - "8000:3000"
   environment:
     - test=testvalue
 inventory-service:
   build:
     context: ./inventory-service
   ports:
     - "8001:3000"
  volumes:
    - my-volume:/var/lib/data

volumes:
  my-volume:
2
3
4
5
6
7
8
9
10
11
12
13
14
15
16
17
18
19
20
21
Above we are creating a volume by the command volumes at the end of the file and on the second row we give it the name my-volume. Furthermore, in the inventory-service portion of our file, we refer to the just created volume and create a mapping to /var/lib/data which is a directory in the volume that will be persisted, through teardowns. Let’s look that it is correctly mapped:
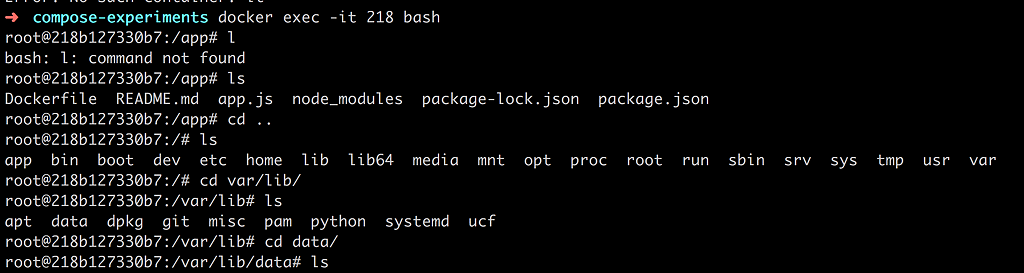
As can be seen, by the above command, we first enter the container with docker exec followed by us navigating to our mapping directory, it is there, great 😃.
Let’s create a file in the data directory so we can prove that our volume mapping really works:
echo persist > persist.log
The above command creates a file persist.log with the content persist . Nothing fancy but it does create a file that we can look for after tearing down and restarting our container.
Now we can exit the container. Next, let’s recap on some useful Volume commands:
docker volume ls

The above lists all the currently mounted volumes. We can see that our created Volume is there compose-experiments_my-volume .
We can dive into more details with:
docker volume inspect compose-experiments_my-volume

Ok, so it’s giving us some details about our volume such as Mountpoint, which is where files will be persisted when we write to our volume mapping directory in the container.
Let’s now bring down our containers with:
docker-compose down
This means that the Volume should still be there so let’s bring them all up with:
docker-compose up -d
Let’s enter the container next and see if our persist.log file is there:
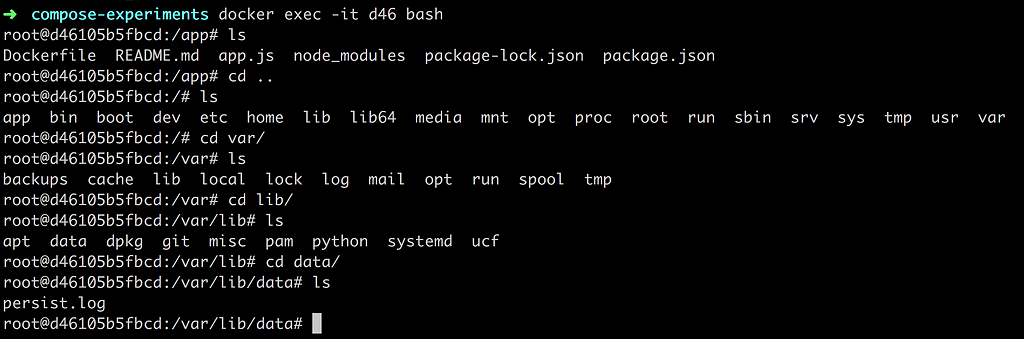
Oh yeah, it works.
###Turn your current directory into a Volume
Ok, for this we need to add a new volume and we need to point out a directory on our computer and a place in the container that should be in sync. Your docker-compose.yaml file should look like the following:
// docker-compose.yaml

version: '3'
services:
  product-service:
    build:
      context: ./product-service
    ports:
      - "8000:3000"
    environment:
      - test=testvalue
    volumes:
      - type: bind
      source: ./product-service
      target: /app
  inventory-service:
    build:
      context: ./inventory-service
    ports:
      - "8001:3000"
    volumes:
      - my-volume:/var/lib/data

volumes:
  my-volume:
2
3
4
5
6
7
8
9
10
11
12
13
14
15
16
17
18
19
20
21
22
23
24
25
The new addition is added to the product-service. We can see that we are specifying a volumes command with one entry. Let’s break down that entry:
- type: bind , this creates a so-called bind mount, a type of volume more fit for purpose of syncing files between your local directory and your container
- source , this is simply where your files are, as you can see we are pointing out
./product-service. This means that as soon as we change a file under that directory Docker will pick up on it. - target , this is the directory in the container, source and target will now be in sync we do a change in source, the same change will happen to target
##Networks and databases
Ok then, this is the last part we aim to cover in this article. Let’s start with databases. All major vendors have a Docker image like Sql Server, Postgres, MySQL and so on. This means we don’t need to do the build-step to get them up and running but we do need to set things like environment variables and of course open up ports so we can interact with them. Let’s have a look at how we can add a MySQL database to our solution, that is our docker-compose.yml file.
Adding a database
Adding a database to docker-compose.yaml is about adding an already premade image. Lucky for us MySQL already provides a ready-made one. To add it we just need to add another entry under services: like so:
// docker-compose.yaml

product-db:
  image: mysql
  environment:
    - MYSQL_ROOT_PASSWORD=complexpassword
  ports:
    - 8002:3306
2
3
4
5
6
7
8
Let’s break it down:
product-dbis the name of our new service entry, we choose this nameimageis a new command that we are using instead of build , we use this when the image is already built, which is true for most databasesenvironment, most databases will need to have a certain number of variables set to be able to connect to them like username, password and potentially the name of the database, this varies per type of database. In this case, we set MYSQL_ROOT_PASSWORD so we instruct the MySQL instance what the password is for the root user. We should consider creating a number of users with varying access levels- ports, this is exposing the ports that will be open and thereby this is our entrance in for talking to the database. By typing
8002:3306we say that the container's port3306should be mapped to the external port8002
Let’s see if we can get the database and the rest of our services up and running:
docker-compose up -d

Let’s verify with:
docker-compose ps OR docker ps
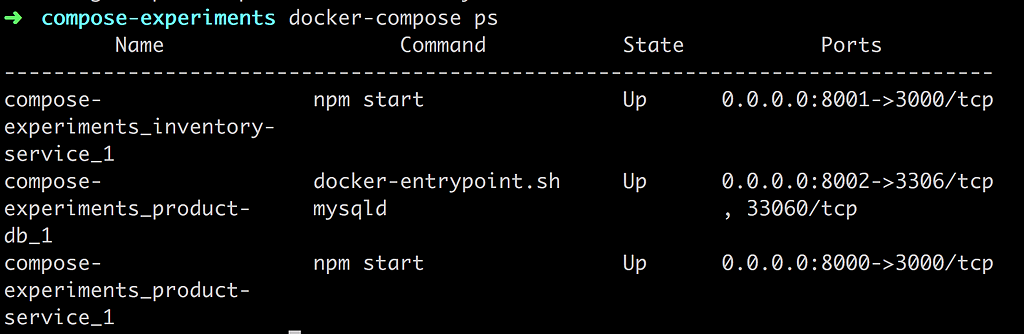
Looks, good, our database service experiments_product-db_1 seems to be up and running on port 8002. Let’s see if we can connect to the database next. The below command will connect us to the database, fingers crossed 😉
mysql -uroot -pcomplexpassword -h 0.0.0.0 -P 8002

and the winner is…
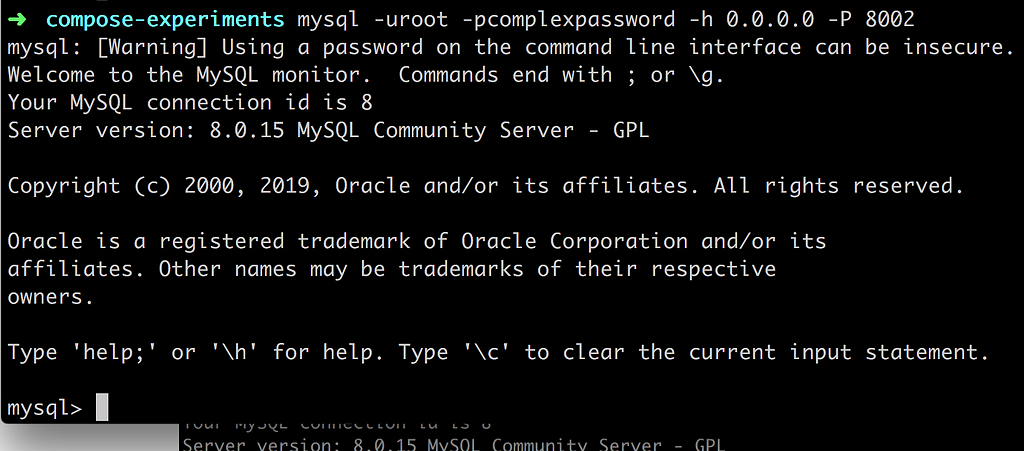
Great, we did it. Next up let’s see if we can update one of our services to connect to the database.
Connecting to the database
There are three major ways we could be connecting to the database:
- using docker client, we’ve tried this one already with
mysql -uroot -pcomplexpassword -h 0.0.0.0 -P 8002 - enter our container, we do this using
docker exec -it [name of container] bashand then we typemysqlinside of the container - connecting through our app, this is what we will look at next using the NPM library mysql
We will focus on the third choice, connecting to a database through our app. The database and the app will exist in different containers. So how do we get them to connect? The answer is:
- needs to be in the same network , for two containers to talk to each other they need to be in the same network
- database needs to be ready , it takes a while to start up a database and for your app to be able to talk to the database you need to ensure the database have started up correctly, this was a fun/interesting/painful til I figured it out, so don’t worry I got you, we will succeed 😃
- create a connection object , ensure we set up the connection object correctly in
app.jsforproduct-service
Let’s start with the first item here. How do we get the database and the container into the same network? Easy, we create a network and we place each container in that network. Let’s show this in docker-compose.yaml:
// excerpt from docker-compose.yaml

networks:
  products:
2
3
4
We need to assign this network to each service, like so:
// excerpt from docker-compose.yaml

services:
  some-service:
    networks:
      - products
2
3
4
5
6
Now, for the second bullet point, how do we know that the database is finished initializing? Well, we do have a property called depends_on, with that property, we are able to specify that one container should wait for another container to start up first. That means we can specify it like so:
// excerpt from docker-compose.yaml

services:
 some-service:
   depends_on: db
 db:
   image: mysql
2
3
4
5
6
7
Great so that solves it or? Nope nope nope, hold your horses:

So in Docker compose version 2 there used to be an alternative where we could check for a service’s health, if health was good we could process to spin up our container. It looked like so:
depends_on:
 db:
   condition: service_healthy
2
3
This meant that we could wait for a database to initialize fully. This was not to last though, in version 3 this option is gone. Here is doc page that explains why, control startup and shutdown order. The gist of it is that now it’s up to us to find out when our database is done and ready to connect to. Docker suggests several scripts for this:
All these scripts have one thing in common, the idea is to listen to a specific host and port and when that replies back, then we run our app. So what do we need to do to make that work? Well let’s pick one of these scripts, namely wait-for-it and let’s list what we need to do:
- copy this script into your service container
- give the script execution rights
- instruct the docker file to run the script with database host and port as args and then to run the service once the script OKs it
Let’s start with copying the script from GitHub into our product-service directory so it now looks like this:
/product-service
  wait-for-it.sh
  Dockerfile
  app.js
  package.json
2
3
4
5
Now let’s open up the Dockerfile and add the following:
// Dockerfile

FROM node:latest

WORKDIR /app

ENV PORT=3000

COPY . .

RUN npm install

EXPOSE $PORT

COPY wait-for-it.sh /wait-for-it.sh

RUN chmod +x /wait-for-it.sh
2
3
4
5
6
7
8
9
10
11
12
13
14
15
16
17
Above we are copying the wait-for-it.sh file to our container and on the line below we are giving it execution rights. Worth noting is how we also remove the ENTRYPOINT from our Dockerfile, we will instead instruct the container to start from the docker-compose.yaml file. Let’s have a look at said file next:
// excerpt from docker-compose.yaml

services:
 product-service:
 command: ["/wait-for-it.sh", "db:8002", "--", "npm", "start"]
 db:
 // definition of db service below
2
3
4
5
6
7
Above we are telling it to run the wait-for-it.sh file and as an argument use db:8002 and after it gets a satisfactory response then we can go on to run npm start which will then start up our service. That sounds nice, will it work?
For full disclosure let’s show our full docker-compose.yaml file:
version: '3.3'
  services:
    product-service:
      depends_on:
        - "db"
      build:
        context: ./product-service
      command: ["/wait-for-it.sh", "db:8002", "--", "npm", "start"]
    ports:
      - "8000:3000"
    environment:
      - test=testvalue
      - DATABASE_PASSWORD=complexpassword
      - DATABASE_HOST=db
    volumes:
      - type: bind
      source: ./product-service
      target: /app
    networks:
      - products
   db:
     build: ./product-db
       restart: always
     environment:
       - "MYSQL_ROOT_PASSWORD=complexpassword"
       - "MYSQL_DATABASE=Products"
     ports:
       - "8002:3306"
     networks:
       - products
   inventory-service:
     build:
       context: ./inventory-service
     ports:
       - "8001:3000"
     volumes:
       - my-volume:/var/lib/data

volumes:
 my-volume:

networks:
 products:
2
3
4
5
6
7
8
9
10
11
12
13
14
15
16
17
18
19
20
21
22
23
24
25
26
27
28
29
30
31
32
33
34
35
36
37
38
39
40
41
42
43
Ok, so to recap we placed product-service and db in the network products and we downloaded the script wait-for-it.sh and we told it to run before we spun up the app and in the process listen for the host and port of the database that would respond as soon as the database was ready for action. That means we have one step left to do, we need to adjust the app.js file of the product-service, so let’s open that file up:
// app.js

const express = require('express')
const mysql = require('mysql');
const app = express()
const port = process.env.PORT || 3000;
const test = process.env.test;

let attempts = 0;

const seconds = 1000;

function connect() {
  attempts++;

  console.log('password', process.env.DATABASE_PASSWORD);
  console.log('host', process.env.DATABASE_HOST);
  console.log(`attempting to connect to DB time: ${attempts}`);

 const con = mysql.createConnection({
   host: process.env.DATABASE_HOST,
   user: "root",
   password: process.env.DATABASE_PASSWORD,
   database: 'Products'
 });

  con.connect(function (err) {
   if (err) {
     console.log("Error", err);
     setTimeout(connect, 30 * seconds);
   } else {
     console.log('CONNECTED!');
   }

  });

  conn.on('error', function(err) {
    if(err) {
      console.log('shit happened :)');
      connect()
    }
  });

}
connect();

app.get('/', (req, res) => res.send(`Hello product service, changed ${test}`))

app.listen(port, () => console.log(`Example app listening on port ${port}!`))
2
3
4
5
6
7
8
9
10
11
12
13
14
15
16
17
18
19
20
21
22
23
24
25
26
27
28
29
30
31
32
33
34
35
36
37
38
39
40
41
42
43
44
45
46
47
48
49
Above we can see that we have defined a connect() method that creates a connection by invoking createConnection() with an object as an argument. That input argument needs to know host, user, password and database. That seems perfectly reasonable. We also add a bit of logic to the connect() method call namely we invoke setTimeout(), this means that it will attempt to do another connection after 30 seconds. Now, because we use wait-for-it.sh that functionality isn’t really needed but we could rely on application code alone to ensure we get a connection. However, we also call conn.on('error') and the reason for doing so is that we can loose a connection and we should be good citizens and ensure we can get that connection back.
Anyway, we’ve done everything in our power, but because we’ve introduced changes to Dockerfile let’s rebuild everything with docker-compose build and then let’s bring everything up with:
docker-compose up
and….
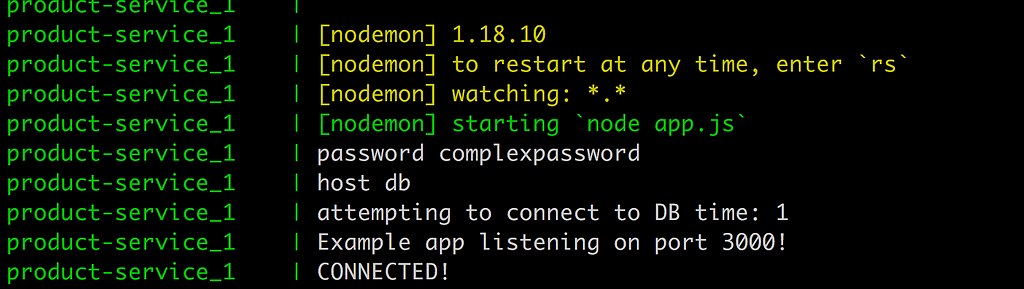
There it is, Houston WE HAVE A CONNECTION, or as my friend Barney likes to put it:

Setting up the database — fill it with structure and data
Ok, maybe you were wondering about the way we built the service db ? That part of docker-compose.yaml looked like this:
// docker-compose.yaml

db:
  build: ./product-db
  restart: always
  environment:
    - "MYSQL_ROOT_PASSWORD=complexpassword"
    - "MYSQL_DATABASE=Products"
  ports:
    - "8002:3306"
  networks:
    - products
2
3
4
5
6
7
8
9
10
11
12
I would you to look at build especially. We mentioned at the beginning of this article that we can pull down ready-made images of databases. That statement is still true but by creating our own Dockerfile for this, we can not only specify the database we want but we can also run commands like creating our database structure and insert seed data. Let’s have a close look at the directory product-db:
/product-db
  Dockerfile
  init.sql
2
3
Ok, we have a Dockerfile, let’s look at that first:
// Dockerfile

FROM mysql:5.6

ADD init.sql /docker-entrypoint-initdb.d
2
3
4
5
We specify that init.sql should be copied and renamed to docker-entrypoint-initdb.d which means it will run the first thing that happens. Great, what about the content of init.sql?
// init.sql

CREATE DATABASE IF NOT EXISTS Products;

# create tables here
# add seed data inserts here
2
3
4
5
6
As you can see it doesn’t contain much for the moment but we can definitely expand it, which is important.
Summary
We have now come full circle in this series, we have explained everything from the beginning. The basic concepts, the core commands, how to deal with volumes and databases and also how to be even more effective with Docker Compose. This series will continue of course and go deeper and deeper into Docker but this should hopefully take you a bit on the way. Thanks for reading this far.