Learn Kubernetes - from the beginning, part III scaling my app
Follow me on Twitter, happy to take your suggestions on topics or improvements /Chris
![]()
This third part aims to show how you scale your application. We can easily set the number of Replicas we want of a certain application and let Kubernetes figure out how to do that. This is us defining a so-called desired state.
When traffic increases, we will need to scale the application to keep up with user demand. We've talked about deployments and services, now lets talk scaling.
- Part I - from the beginning, Part I, Basics, Deployment and Minikube In this part, we cover why Kubernetes, some history and some basic concepts like deploying, Nodes, Pods.
- Part II - introducing Services and Labeling In this part, we deepen our knowledge of Pods and Nodes. We also introduce Services and labeling using labels to query our artifacts.
- Part III - Scaling, we are here
- Part IV - Auto scaling In this part we look at how to set up auto-scaling so we can handle sudden large increases of incoming requests
What does scaling mean in the context of Kubernetes?
We get more Pods. More Pods that are scheduled to nodes.
Now it's time to talk about desired state again, that we mentioned in previous parts.
This is where we relinquish control to Kubernetes. All we need to do is tell Kubernetes how many Pods we want and Kubernetes does the rest.
So we tell Kubernetes about the number of Pods we want, what does that mean? What does Kubernetes do for us?
It means we get multiple instances of our application. It also means traffic is being distributed to all of our Pods, ie. load balancing.
Furthermore, Kubernetes, or more specifically, services within Kubernetes will monitor which Pods are available and send traffic to those Pods.
Resources
- Free Azure Account If you want to try out AKS, Azure Kubernetes Service, you will need a free Azure account
- Kubernetes.io One of the best resources to learn about Kubernetes is at this official Kubernetes site by Google.
- Kubernetes overview An overview of Kubernetes, all its parts and how it works
- Kubernetes in the Cloud Do you feel you know everything about Kubernetes already and just want to learn how to use a managed service? Then this link is for you
- Documentation on AKS, Azure Kubernetes Service Azure Kubernetes Service, a managed Kubernetes
- Best practices on AKS You already know AKS and want to learn how to use it better?
Scaling demo Lab
If you haven't followed the first two parts I do recommend you go back and have a read. What you need for the following to work is at least a deployment. So if you haven't created one, here is how:
kubectl run kubernetes-first-app --image=gcr.io/google-samples/kubernetes-bootcamp:v1 --port=8080
Let's have a look at our deployments:
kubectl get deployments
Let's look closer at the response we get:

We have three pieces of information that are important to us. First, we have the READY column in which we should read the value in the following way, CURRENT STATE/DESIRED STATE. Next up is the UP_TO_DATE column which shows the number of replicas that were updated to match the desired state.
Lastly, we have the AVAILABLE column that shows how many replicas we have available to do work.
Let's scale
Now, let's do some scaling. For that we will use the scale command like so:
kubectl scale deployments/kubernetes-first-app --replicas=4

as we can see above the number of replicas was increased to 4 and kubernetes is thereby ready to load balance any incoming requests.
Let's have a look at our Pods next:

When we asked for 4 replicas we got 4 Pods.
We can see that this scaling operation took place by using the describe command, like so:
kubectl describe deployments/kubernetes-first-app
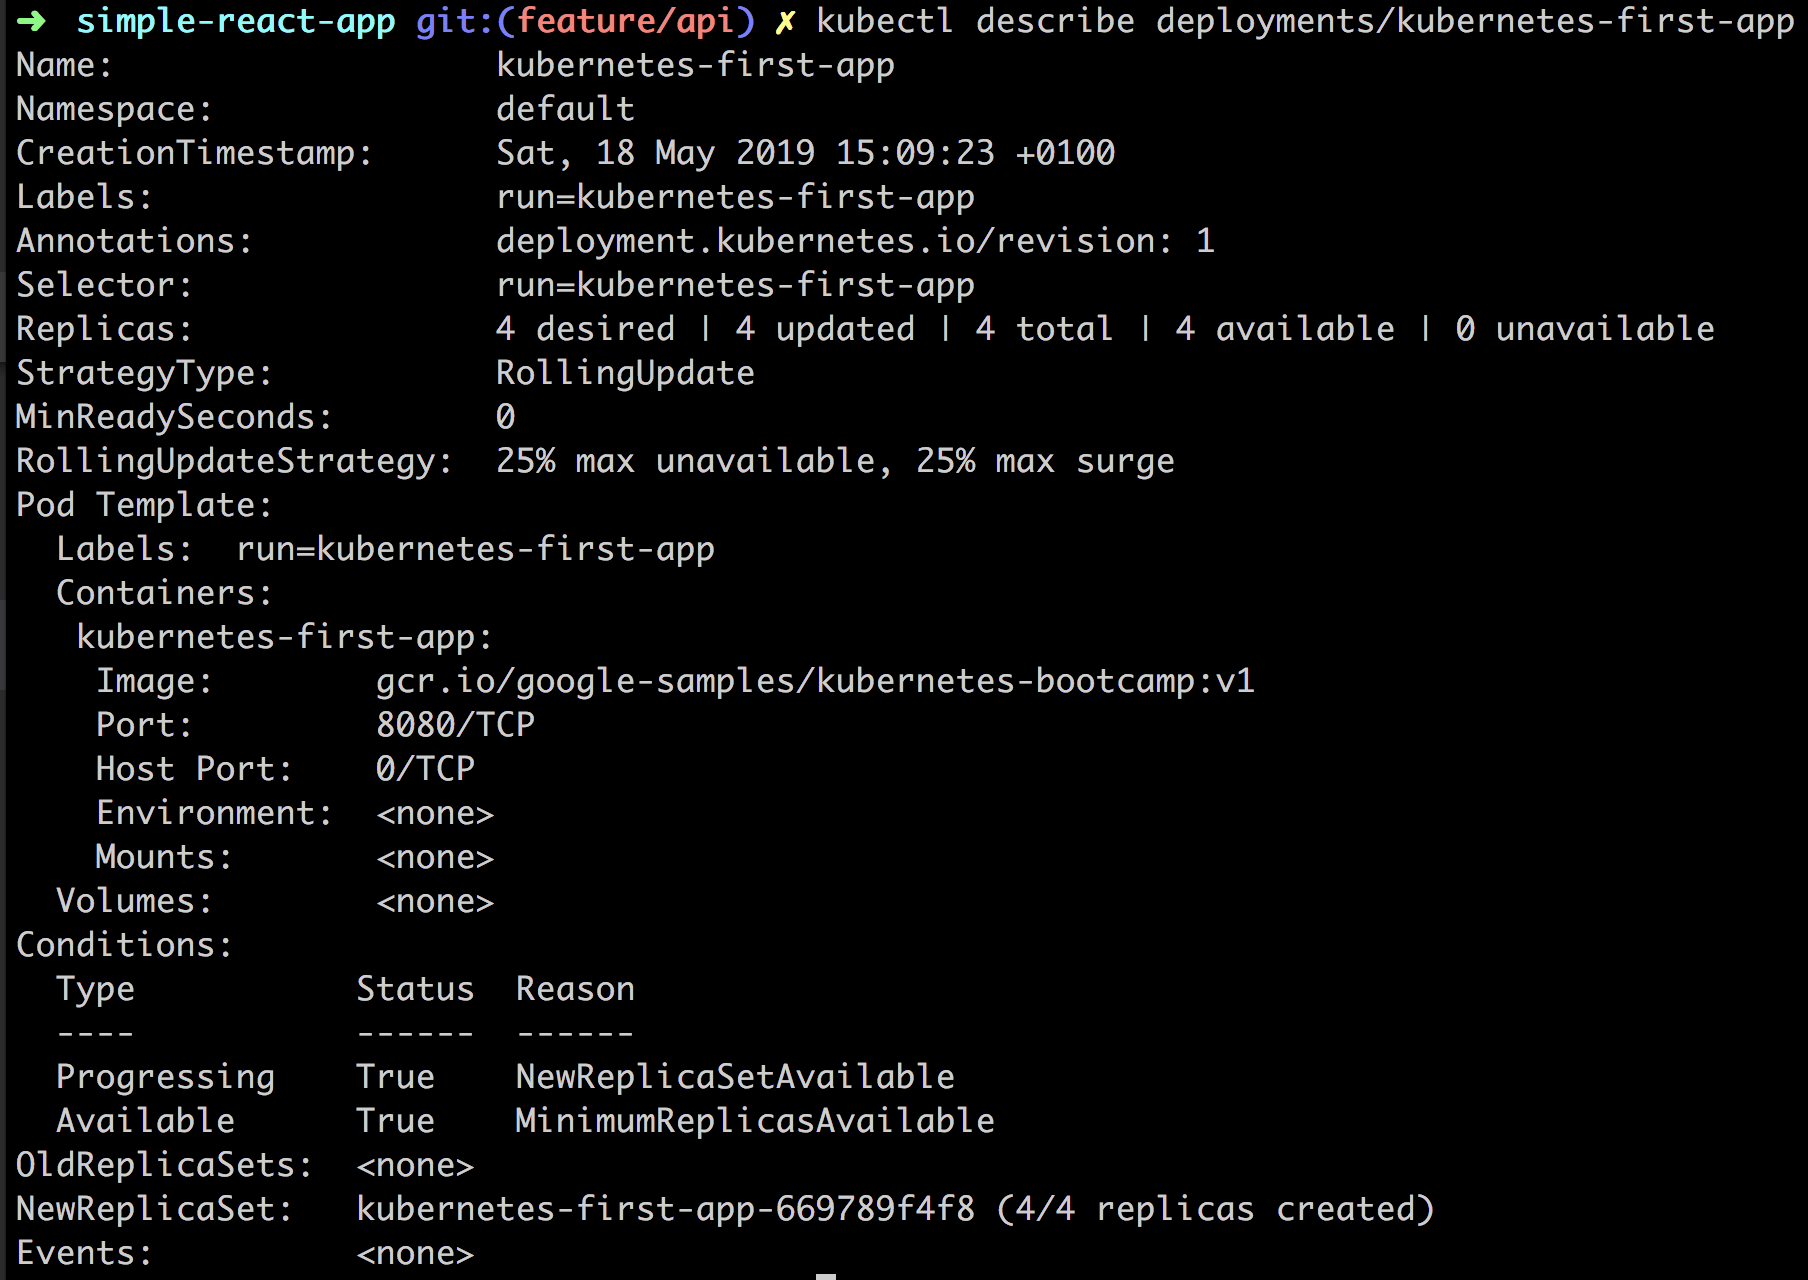
In the above image, we are given quite a lot of information on our Replicas for example, but there is some other information in there that we will explain later on.
Does it load balance?
The whole point with the scaling was so that we could balance the load on incoming requests. That means that not the same Pod would handle all the requests but that different Pods would be hit.
We can easily try this out, now that we have scaled our app to contain 4 replicas of itself.
So far we used the describe command to describe the deployment but we can use it to describe the IP and port of. Once we have the IP and port we can then hit it with different HTTP requests.
kubectl describe services/kubernetes-first-app
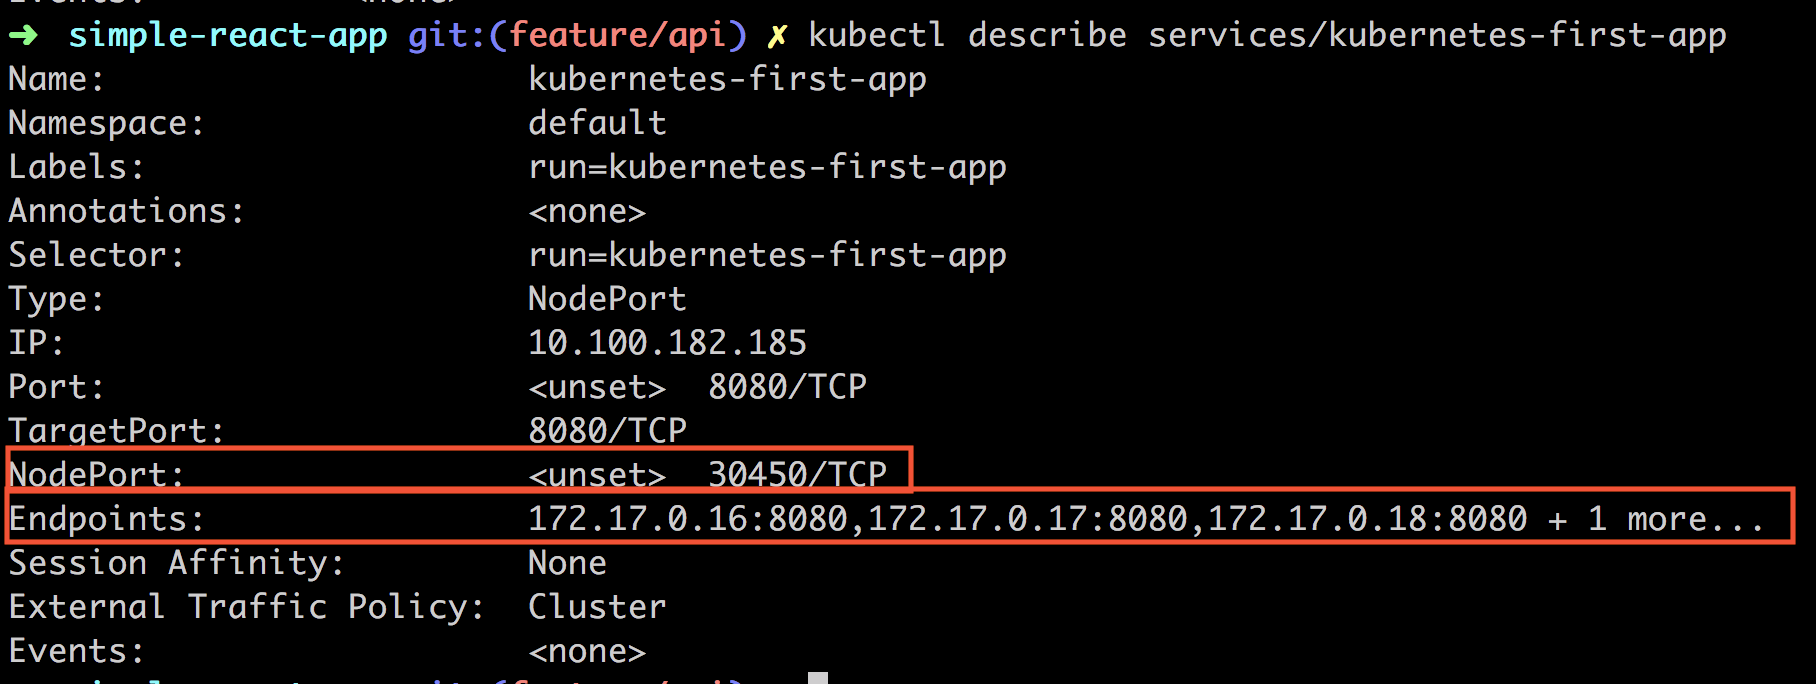
Especially look at the NodePort and the Endpoints. NodePort is the port value that we want to hit with an HTTP request.
Now we will actually invoke the cURL command and ensure that it hits a different port each time and thereby prove our load balancing is working. Let's do the following:
NODE_PORT=30450
Next up the cURL call:
curl $(minikube ip):$NODE_PORT
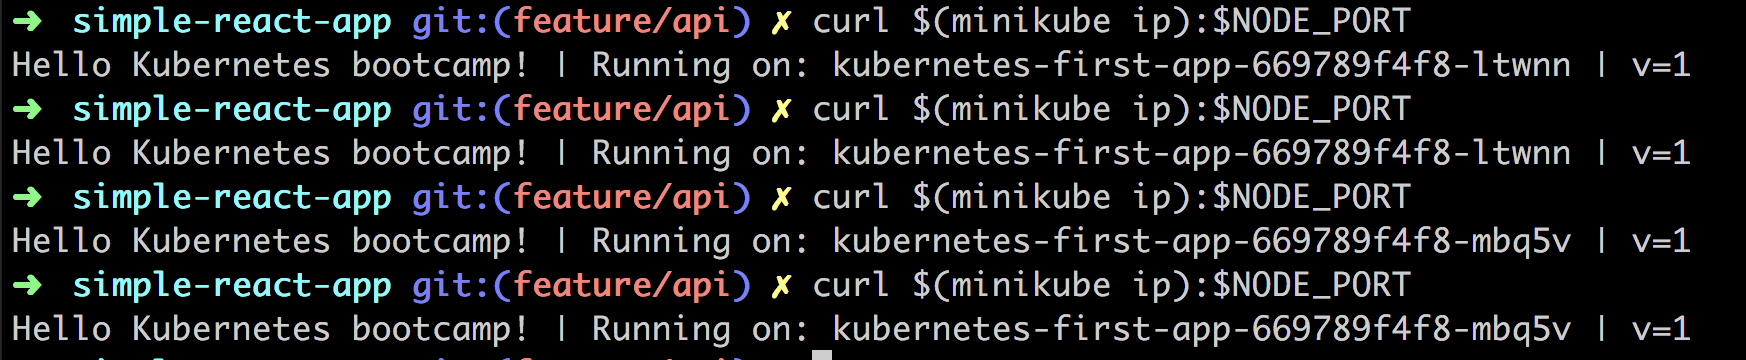
As you can see above we are doing the call 4 times. Judging by the output and the name of the instance we see that we are hitting a different Pod for each request. Thereby we see that the load balancing is working.
Scaling down
So far we have scaled up. We managed to go from one Pod to 4 Pods thanks to the scale command. We can use the same command to scale down, like so:
kubectl scale deployments/kubernetes-first-app --replicas=2

Now if we are really fast adding the next command we can see how the Pods are being removed as Kubernetes is trying to adjust to desired state.

2 out of 4 Pods are saying Terminating as only 2 Pods are needed to maintain the new desired state.
Running our command again we see that only 2 Pods remain and thereby our new desired state have been reached:

We can also look at our deployment to see that our scale instruction has been parsed correctly:

Self-healing
Self-healing is Kubernetes way of ensuring that the desired state is maintained. Pods don't self heal cause Pods can die. What happens is that a new Pod appears in its place, thanks to Kubernetes.
So how do we test this?
Glad you asked, we can delete a Pod and see what happens. So how do we do that? We use the delete command. We need to know the name of our Pod though so we need to call get pods for that. So let's start with that:
kubectl get pods
Then lets pick one of our two Pods kubernetes-first-app-669789f4f8-6glpx and assign it to a variable:
POD_NAME=kubernetes-first-app-669789f4f8-6glpx
Now remove it:
kubectl delete pods $POD_NAME
Let's be quick about it and check our Pod status with get pods. It should say Terminating like so:

Wait some time and then echo out our variable $POD_NAME followed by get pods. That should give you a result similar to the below.

So what does the above image tell us? It tells us that the Pod we deleted is truly deleted but it also tells us that the desired state of two replicas has been achieved by spinning up a new Pod. What we are seeing is * self-healing* at work.
Different ways to scale
Ok, we looked at a way to scale by explicitly saying how many replicas we want of a certain deployment. Sometimes, however, we might want a different way to scale namely auto-scaling. Auto-scaling is about you not having to set the exact number of replicas you want but rather rely on Kubernetes to create the number of replicas it thinks it needs. So how would Kubernetes know that? Well, it can look at more than one thing but a common metric is CPU utilization. So let's say you have a booking site and suddenly someone releases Bruce Springsteen tickets you are likely to want to rely on auto-scaling, cause the next day when the tickets are all sold out you want the number of Pods to go back to normal and you wouldn't want to do this manually.
Auto-scaling is a topic I plan to cover more in detail in a future article so if you are really curious how that is done I recommend you have a look here
Summary
Ok. So we did it. We managed to scale an app by creating replicas of it. It wasn't so hard to accomplish. We showed how we only needed to provide Kubernetes with a desired state and it would do its utmost to preserve said state, also called * self-healing*. Furthermore, we mentioned that there was another way to scale, namely auto-scaling but decided to leave that topic for another article. Hopefully, you are now more in awe of how amazing Kubernetes is and how easy it is to scale your app.