Activity: Create an SSE server
Let's create an SSE server and also let's ensure we can reach it via clients like the Inspector and Visual Studio Code.
-1- Create the server
- TypeScript
- Python
-
Create a file
server-sse.tsin your existing project and add the following code:import express, { Request, Response } from "express";
import { McpServer } from "@modelcontextprotocol/sdk/server/mcp.js";
import { SSEServerTransport } from "@modelcontextprotocol/sdk/server/sse.js";Note how we're now using the following imports:
SSEServerTransportfrom@modelcontextprotocol/sdk/server/sse.jsinstead ofStdioServerTransport.expressto create an Express server instead of using theStdioServerTransportdirectly.
Let's move on to create the server.
-
Add the following code below the imports:
const server = new McpServer({
name: "example-server",
version: "1.0.0"
});
const app = express();
const transports: {[sessionId: string]: SSEServerTransport} = {};This creates a new instance of the
McpServerclass, which is the main entry point for creating an MCP server. Additionally, we create an Express server and a lookup object for storing the transports. -
Let's implement the two endpoints of the server:
app.get("/sse", async (_: Request, res: Response) => {
const transport = new SSEServerTransport('/messages', res);
transports[transport.sessionId] = transport;
res.on("close", () => {
delete transports[transport.sessionId];
});
await server.connect(transport);
});
app.post("/messages", async (req: Request, res: Response) => {
const sessionId = req.query.sessionId as string;
const transport = transports[sessionId];
if (transport) {
await transport.handlePostMessage(req, res);
} else {
res.status(400).send('No transport found for sessionId');
}
});
app.listen(3001);Great, now we have the two mandatory endpoints.
-
Finally, let's add some tools to the server. Add the following code below the
transportsobject, make sure you add it before the call toapp.listen(3001):server.tool("random-joke", "A joke returned by the chuck norris api", {},
async () => {
const response = await fetch("https://api.chucknorris.io/jokes/random");
const data = await response.json();
return {
content: [
{
type: "text",
text: data.value
}
]
};
}
);This tool will return a random joke from the Chuck Norris API.
The code in server-sse.ts should look like this:
// server-sse.ts
import express, { Request, Response } from "express";
import { McpServer } from "@modelcontextprotocol/sdk/server/mcp.js";
import { SSEServerTransport } from "@modelcontextprotocol/sdk/server/sse.js";
import { z } from "zod";
// Create an MCP server
const server = new McpServer({
name: "example-server",
version: "1.0.0"
});
app = express();
app.get("/sse", async (_: Request, res: Response) => {
const transport = new SSEServerTransport('/messages', res);
transports[transport.sessionId] = transport;
res.on("close", () => {
delete transports[transport.sessionId];
});
await server.connect(transport);
});
app.get("/messages", async (req: Request, res: Response) => {
const sessionId = req.query.sessionId as string;
const transport = transports[sessionId];
if (transport) {
await transport.handlePostMessage(req, res);
} else {
res.status(400).send('No transport found for sessionId');
}
});
app.tool("random-joke", "A joke returned by the chuck norris api", {},
async () => {
const response = await fetch("https://api.chucknorris.io/jokes/random");
const data = await response.json();
return {
content: [
{
type: "text",
text: data.value
}
]
};
}
);
app.listen(3001);
- Add the following code to
server.py
from starlette.applications import Starlette
from starlette.routing import Mount, Host
from mcp.server.fastmcp import FastMCP


mcp = FastMCP("My App")
Now we have imported the correct things and created a server instance.
- Let's add the tools next:
@mcp.tool()
def add(a: int, b: int) -> int:
  """Add two numbers"""
  return a + b

# Mount the SSE server to the existing ASGI server
app = Starlette(
    routes=[
        Mount('/', app=mcp.sse_app()),
    ]
)
-2- Test the server
To test the server, we will test it in two different ways:
- Using the Inspector, this is a great tool to quickly test your server and see the results in a nice UI.
- Using Visual Studio Code. This also provide a nice UI but as it is a code editor, it can make your code development easier depending on what features you add to your MCP server.
-1- Test the server using the Inspector
- TypeScript
- Python
Clone the following project:
git clone https://github.com/softchris/hello-mcp
cd hello-mcp
Then run the following command:
npm install
For the inspector to work, you need to start up the server and the inspector separately
First, start the server by running the following command:
npm run start:server
Next, start the inspector by running the following command:
npm run inspect:server
uvicorn server:app --reload --port 8000
This should start the server.
Now start the inspector in a separate terminal:
npx @modelcontextprotocol/inspector
Select SSE as transport and in the url field, specificy http://localhost:8000/sse and connect.
This will kick off the Inspector and connect to the server.
You should see an inspector window like this:
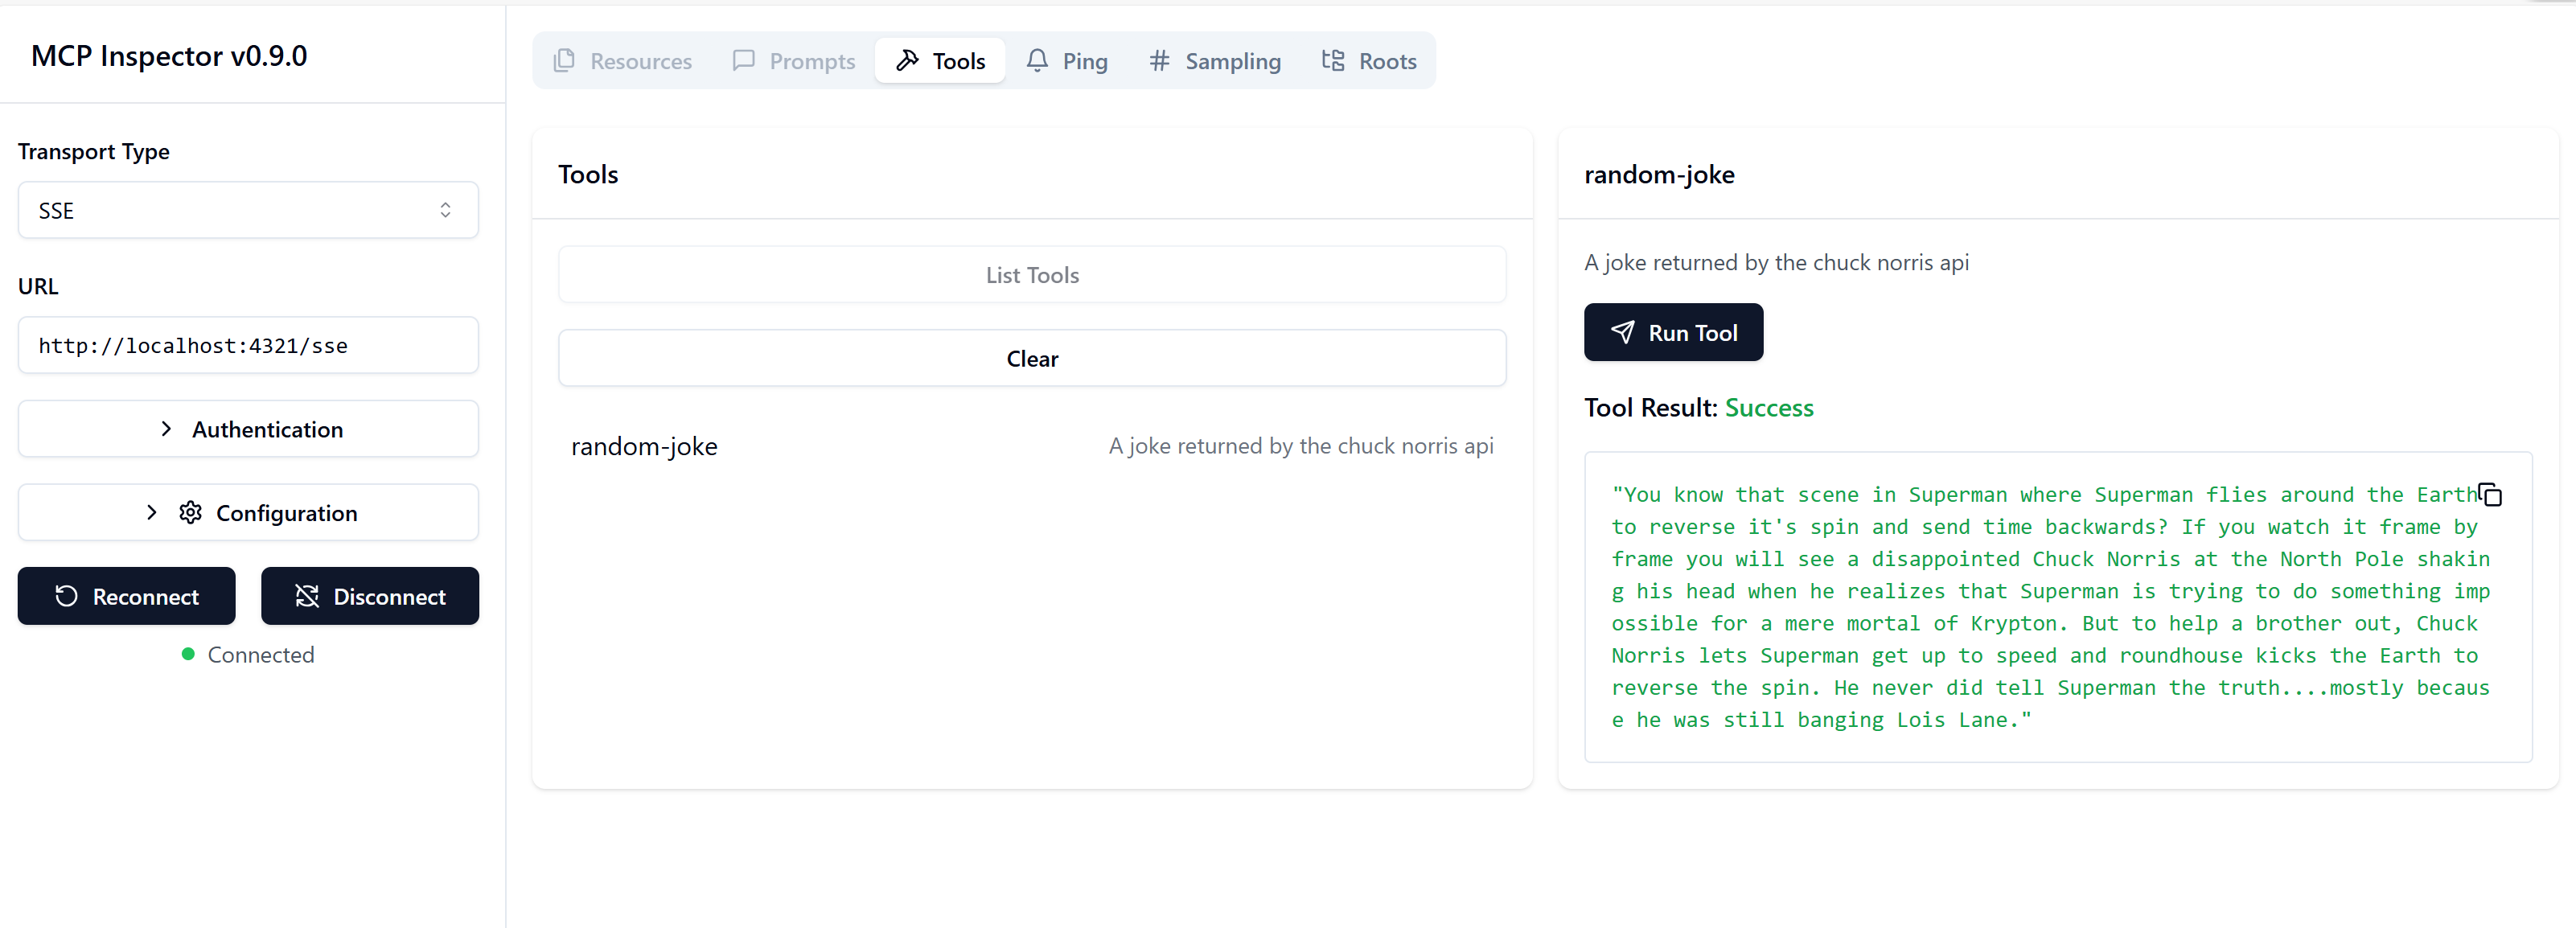
Note how the following have been added:
- Transport: SSE
- URL: http://localhost:4321/sse
In the screenshot, I've already selected "Connect" and "Tools" and have gone on to select the "random-joke" tool and what you're looking at is the result of running the tool.
-2- Test the server using Visual Studio Code
Now we know the server is working great using the inspector, let's test it using Visual Studio Code.
Like we did before, let's add an entry to mcp.json file in the .vscode folder:
 "sse-server": {
    "type": "sse",
    "url": "http://localhost:4321/sse",
}
Type the port here that corresponds to where your server is running.
Important to note here is:
- The type is
sseand notstdio. urlneeds to be specified AND unlike with an stdio server, you need to start up the server before you click the play button.
The complete mcp.json file should look like this:
{
    "inputs": [],
    "servers": {
        "sse-server": {
            "type": "sse",
            "url": "http://localhost:4321/sse",
        }
    }
}
To test the server do the following:
- Start it up.
- Click the play button in the
.vscode/mcp.jsonfile, this should add it to its tools.
Try typing a prompt like so in the Visual Studio Code GitHub Copilot Chat window:
tell me a joke
You should see a result where it's asking to run a tool like this random-joke.
Summary
You've just a simple SSE server that can be used with the Inspector and Visual Studio Code. If you host this server somewhere other people can connect to it.