Activity: Create a first MCP server
What a server can do
An MCP Server is a program that exposes specific capabilities through the MCP protocol. It can be a simple script or a complex application, depending on the use case. The server can interact with local data sources, remote services, and other tools to provide context to LLMs.
For example, an MCP server can:
- Access local files and databases
- Connect to remote APIs
- Perform computations
- Integrate with other tools and services
- Provide a user interface for interaction
Creating a simple server
To create a server, you need to follow these steps:
- Install the MCP SDK.
- Create a new Node.js project and set up the project structure.
- Write the server code.
- Test the server.
-1- Install the MCP SDK
Make sure you have installed Node.js before running the code below. You can check if you have it installed by running node -v in your terminal.
- TypeScript
- Python
npm install @modelcontextprotocol/sdk zod
npm install -D @types/node typescript
- Create a virtual environment
python -m venv venv
venv\Scrips\activate
- Install dependencies
pip install "mcp[cli]"
-2- Create a new project
Create the project structure by following these steps:
- TypeScript
- Python
- Create a
srcfolder
mkdir src
-
Create a file named
index.tsinsrcfolder. -
Scaffold a new Node.js project by running the following command in the root folder:
npm init -y -
Update the
package.jsonto include the following:
{
    "type": "module",
    "bin": {
      "weather": "./build/index.js"
    },
    "scripts": {
      "build": "tsc && chmod 755 build/index.js"
    },
    "files": [
      "build"
    ],
}
For Windows, change build to:
"build": "tsc && node ./build/index.js"
- Create
tsconfig.jsonin the root folder with the following content:
{
  "compilerOptions": {
    "target": "ES2022",
    "module": "Node16",
    "moduleResolution": "Node16",
    "outDir": "./build",
    "rootDir": "./src",
    "strict": true,
    "esModuleInterop": true,
    "skipLibCheck": true,
    "forceConsistentCasingInFileNames": true
  },
  "include": ["src/**/*"],
  "exclude": ["node_modules"]
}
-
Create a
srcfolder. -
Create a file
server.pyin it.
-3- Create the server
- TypeScript
- Python
-
Let's start by adding code to
index.tsto create a simple MCP server:import { McpServer, ResourceTemplate } from "@modelcontextprotocol/sdk/server/mcp.js";
import { StdioServerTransport } from "@modelcontextprotocol/sdk/server/stdio.js";
import { z } from "zod";
// Create an MCP server
const server = new McpServer({
name: "Demo",
version: "1.0.0"
});Next, let's add tools to the server.
-
Add a tool by adding the following code to
index.ts:server.tool("add",
{ a: z.number(), b: z.number() },
async ({ a, b }) => ({
content: [{ type: "text", text: String(a + b) }]
})
);The code above adds a tool called "add" with input parameters
aandb, both of typenumber. The tool returns the sum ofaandbas a text message. We will later show how you can call this tool from a client. -
Add a resource by adding the following code to
index.ts:server.resource(
"greeting",
new ResourceTemplate("greeting://{name}", { list: undefined }),
async (uri, { name }) => ({
contents: [{
uri: uri.href,
text: `Hello, ${name}!`
}]
})
);The preceding code adds a resource called "greeting" with a URI template
greeting://{name}. The idea is that if you invoke this resource with a name, e.ggreeting://John, it will return a greeting message "Hello, John!". -
Lastly, let's add code to start the server and listen for incoming messages. Add the following code to
index.ts:// Start receiving messages on stdin and sending messages on stdout
const transport = new StdioServerTransport();
await server.connect(transport);
Here's the full code for reference:
// index.ts
import { McpServer, ResourceTemplate } from "@modelcontextprotocol/sdk/server/mcp.js";
import { StdioServerTransport } from "@modelcontextprotocol/sdk/server/stdio.js";
import { z } from "zod";

// Create an MCP server
const server = new McpServer({
  name: "Demo",
  version: "1.0.0"
});
// Add an addition tool
server.tool("add",
   { a: z.number(), b: z.number() },
   async ({ a, b }) => ({
     content: [{ type: "text", text: String(a + b) }]
   })
 );
// Add a dynamic greeting resource
server.resource(
   "greeting",
   new ResourceTemplate("greeting://{name}", { list: undefined }),
   async (uri, { name }) => ({
     contents: [{
       uri: uri.href,
       text: `Hello, ${name}!`
     }]
   })
 );
// Start receiving messages on stdin and sending messages on stdout
const transport = new StdioServerTransport();
await server.connect(transport);
- Create the server by adding the below code:
# server.py
from mcp.server.fastmcp import FastMCP

# Create an MCP server
mcp = FastMCP("Demo")
- Now, let's add the tools:
# Add an addition tool
@mcp.tool()
def add(a: int, b: int) -> int:
    """Add two numbers"""
    return a + b
- Finally, let's add a resource:
 # Add a dynamic greeting resource
@mcp.resource("greeting://{name}")
def get_greeting(name: str) -> str:
    """Get a personalized greeting"""
    return f"Hello, {name}!"

if __name__ == "__main__":
    mcp.run()
Testing our server
So far, you've created a simple MCP server and your file directory structure should look like this:
- TypeScript
- Python
src/
├── index.ts
package.json
package-lock.json
tsconfig.json
src/
|-- server.py
Your server has a tool "add" and a resource "greeting". The server is ready to receive messages on stdin and send messages on stdout.
-1- Run the inspector tool
The easiest way to test your server is to use the inspector tool. It's a tool we can run via npx.
- TypeScript
- Python
Let's add it as a command to package.json:
{
  "scripts": {
    "build": "tsc && chmod 755 build/index.js",
    "inspector": "npx @modelcontextprotocol/inspector node build/index.js"
  }
}
-
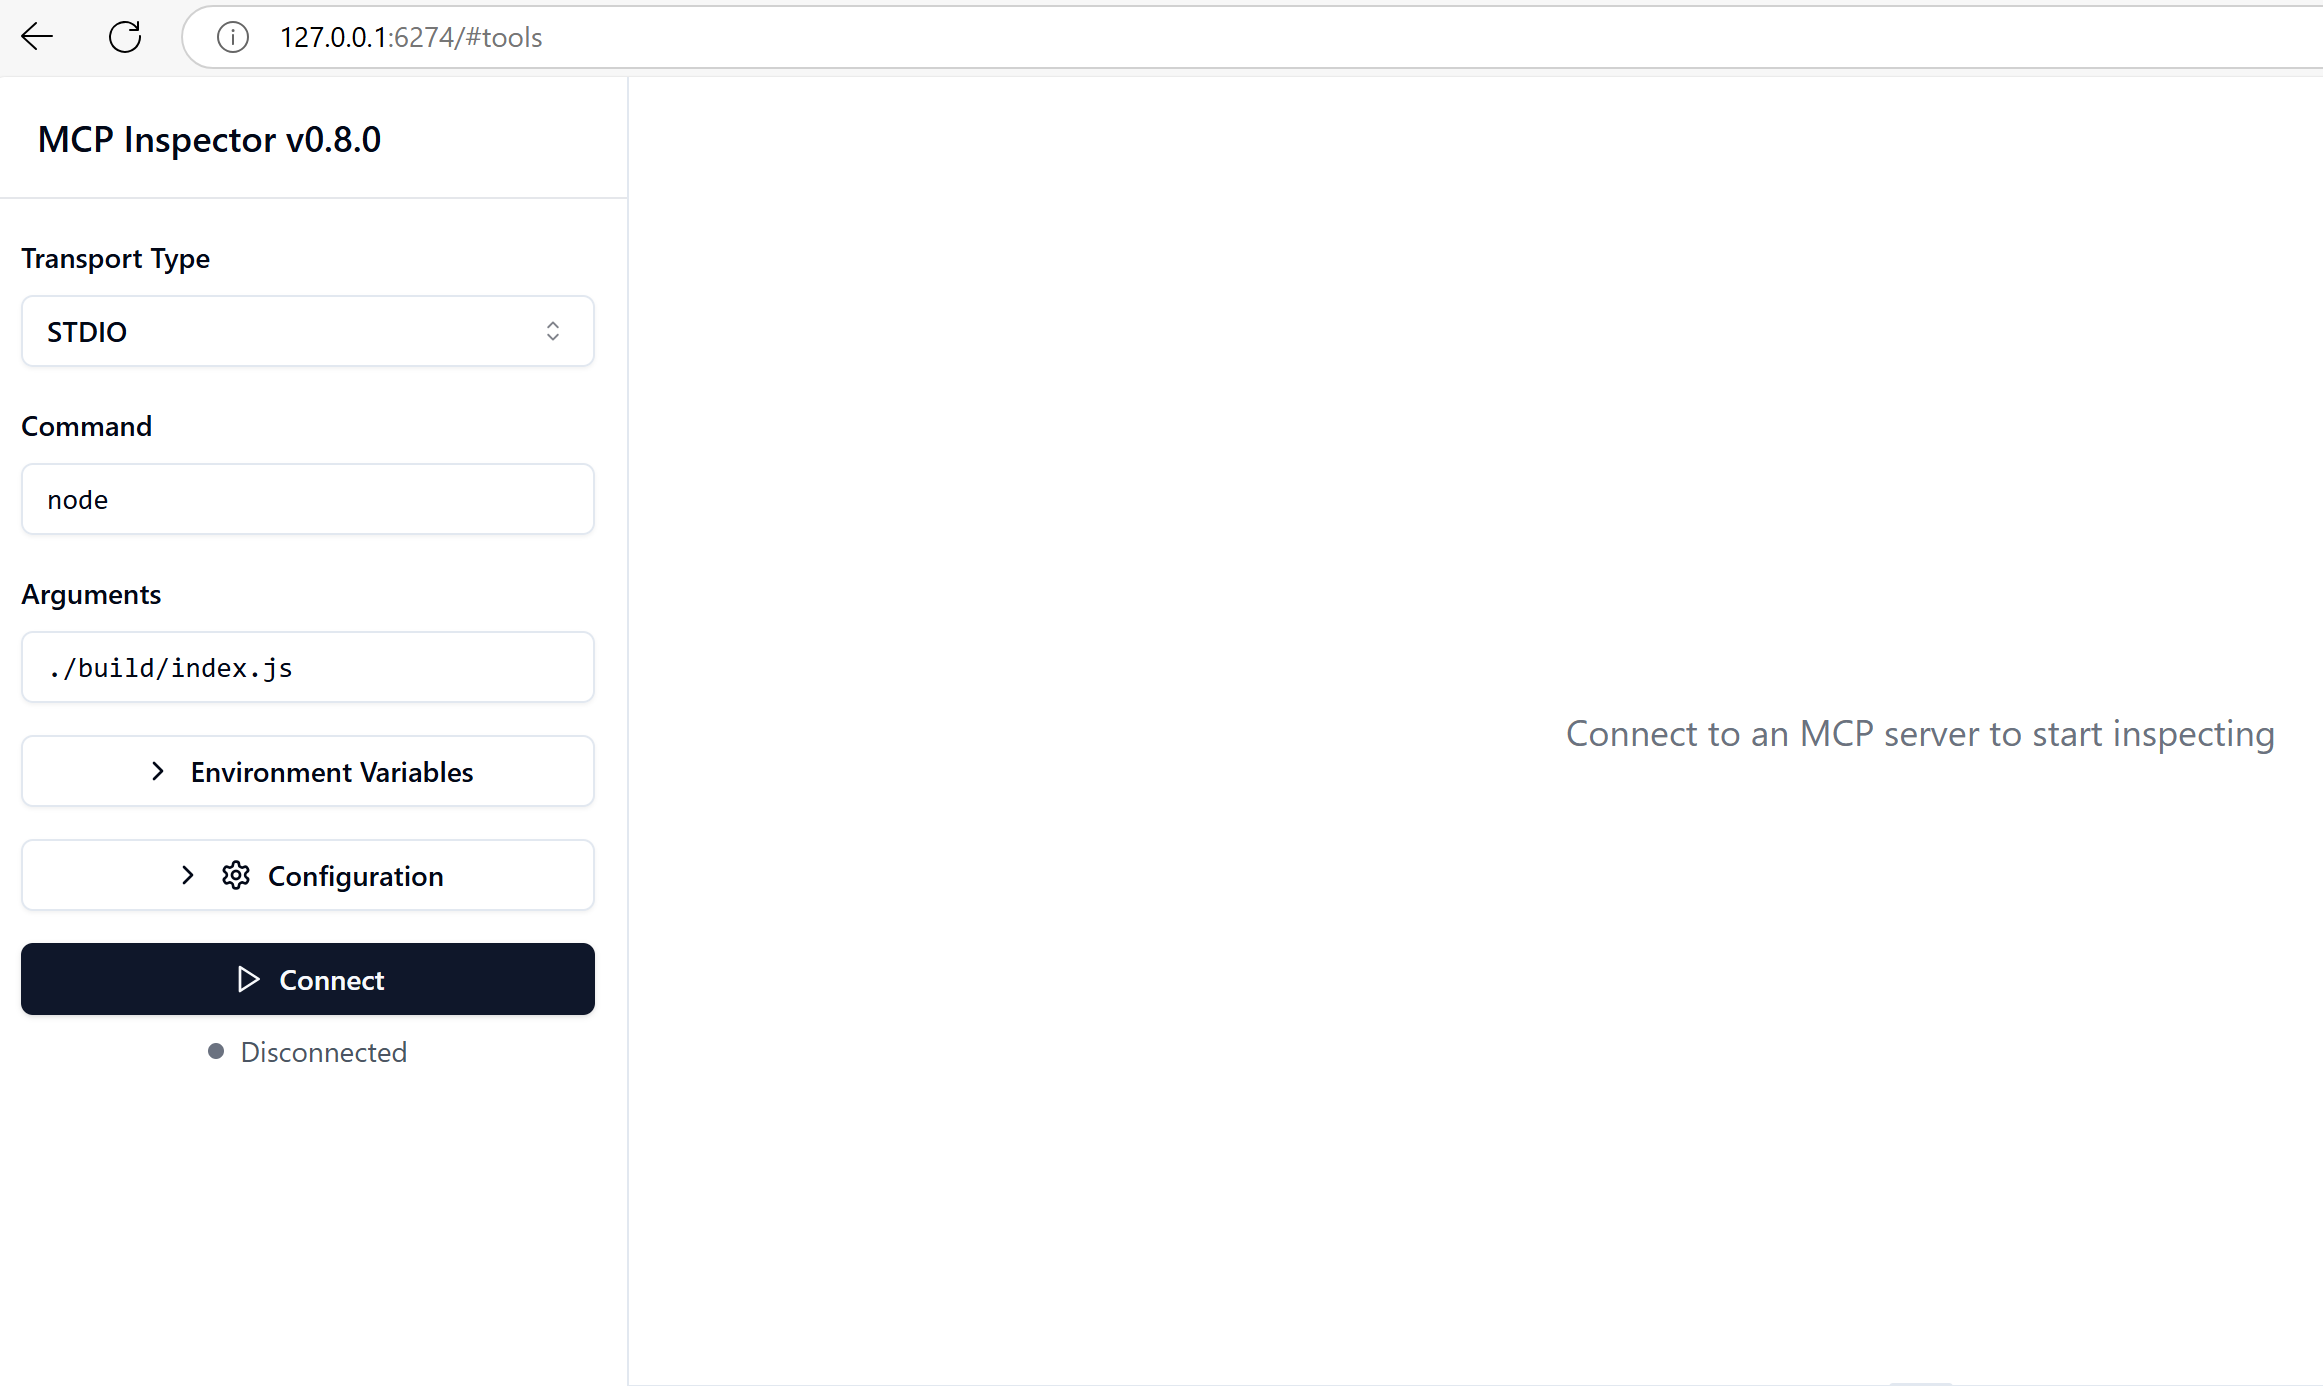
Run the inspector tool by running the following command in your terminal:
npm run inspectorYou should see a window like this:
mcp dev server.py
You should see a window like this:
-2- Connect to the server
-
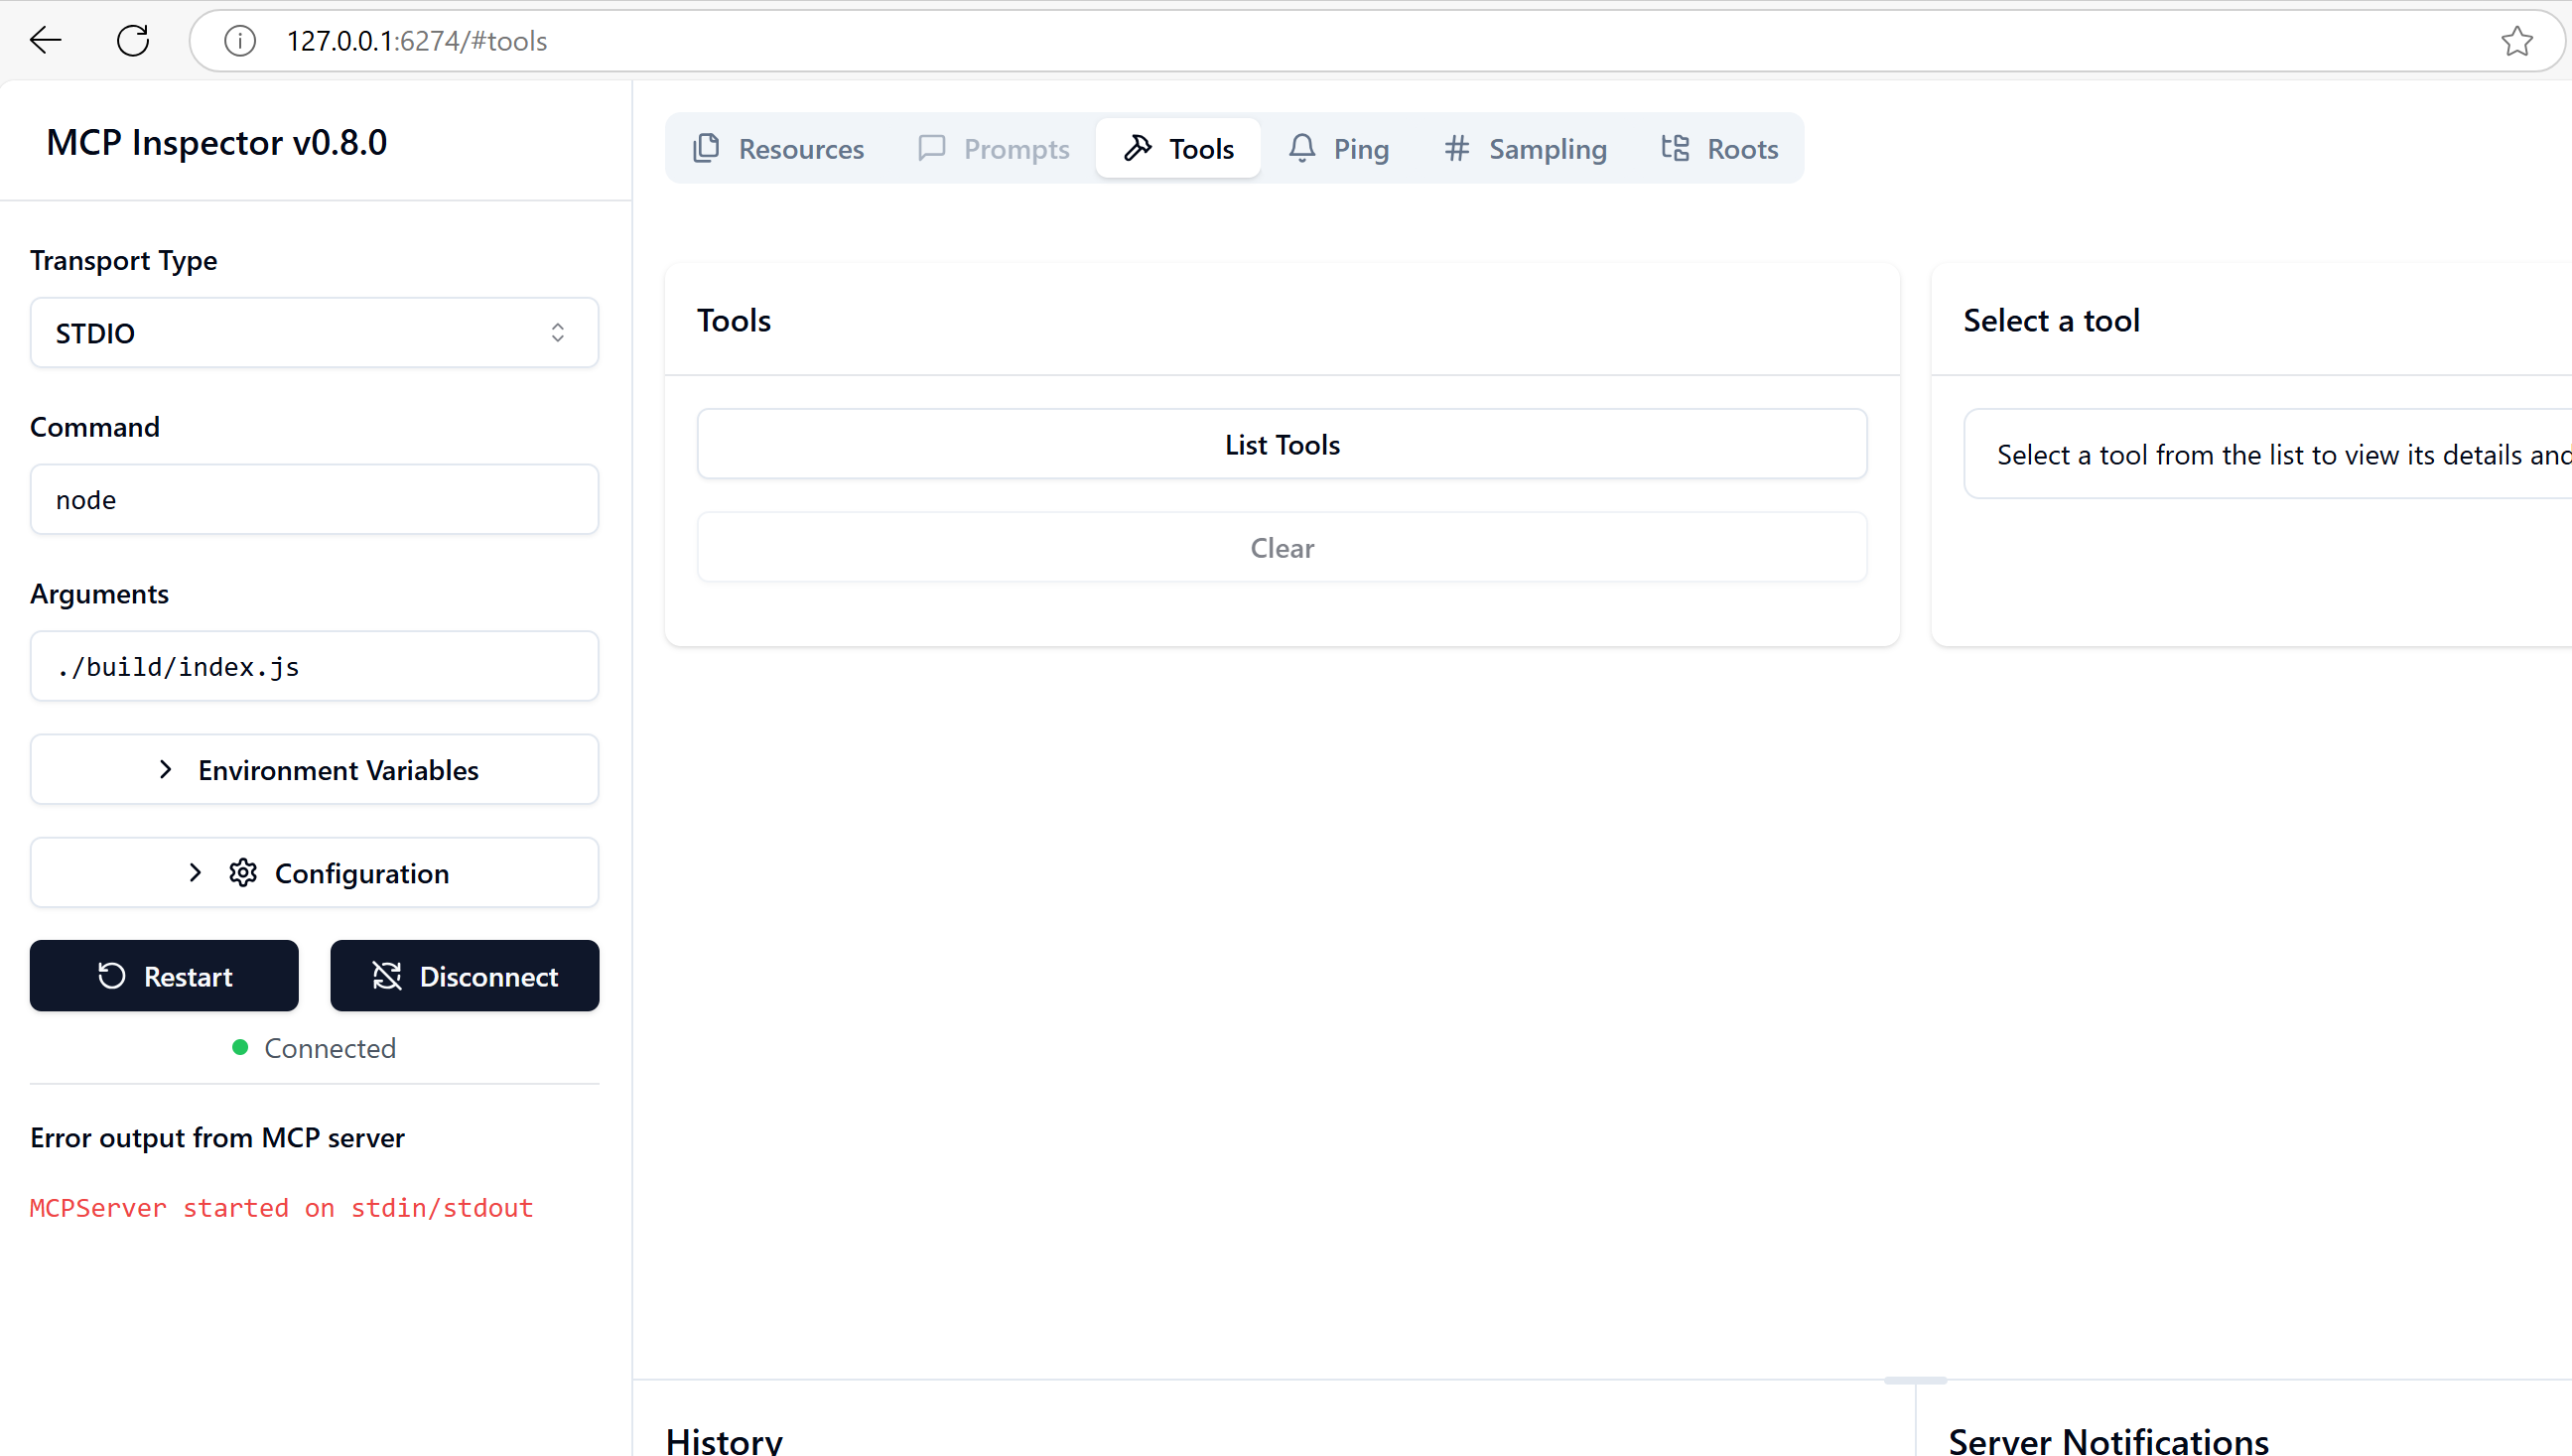
Select to "Connect" and you should see the window below:
-
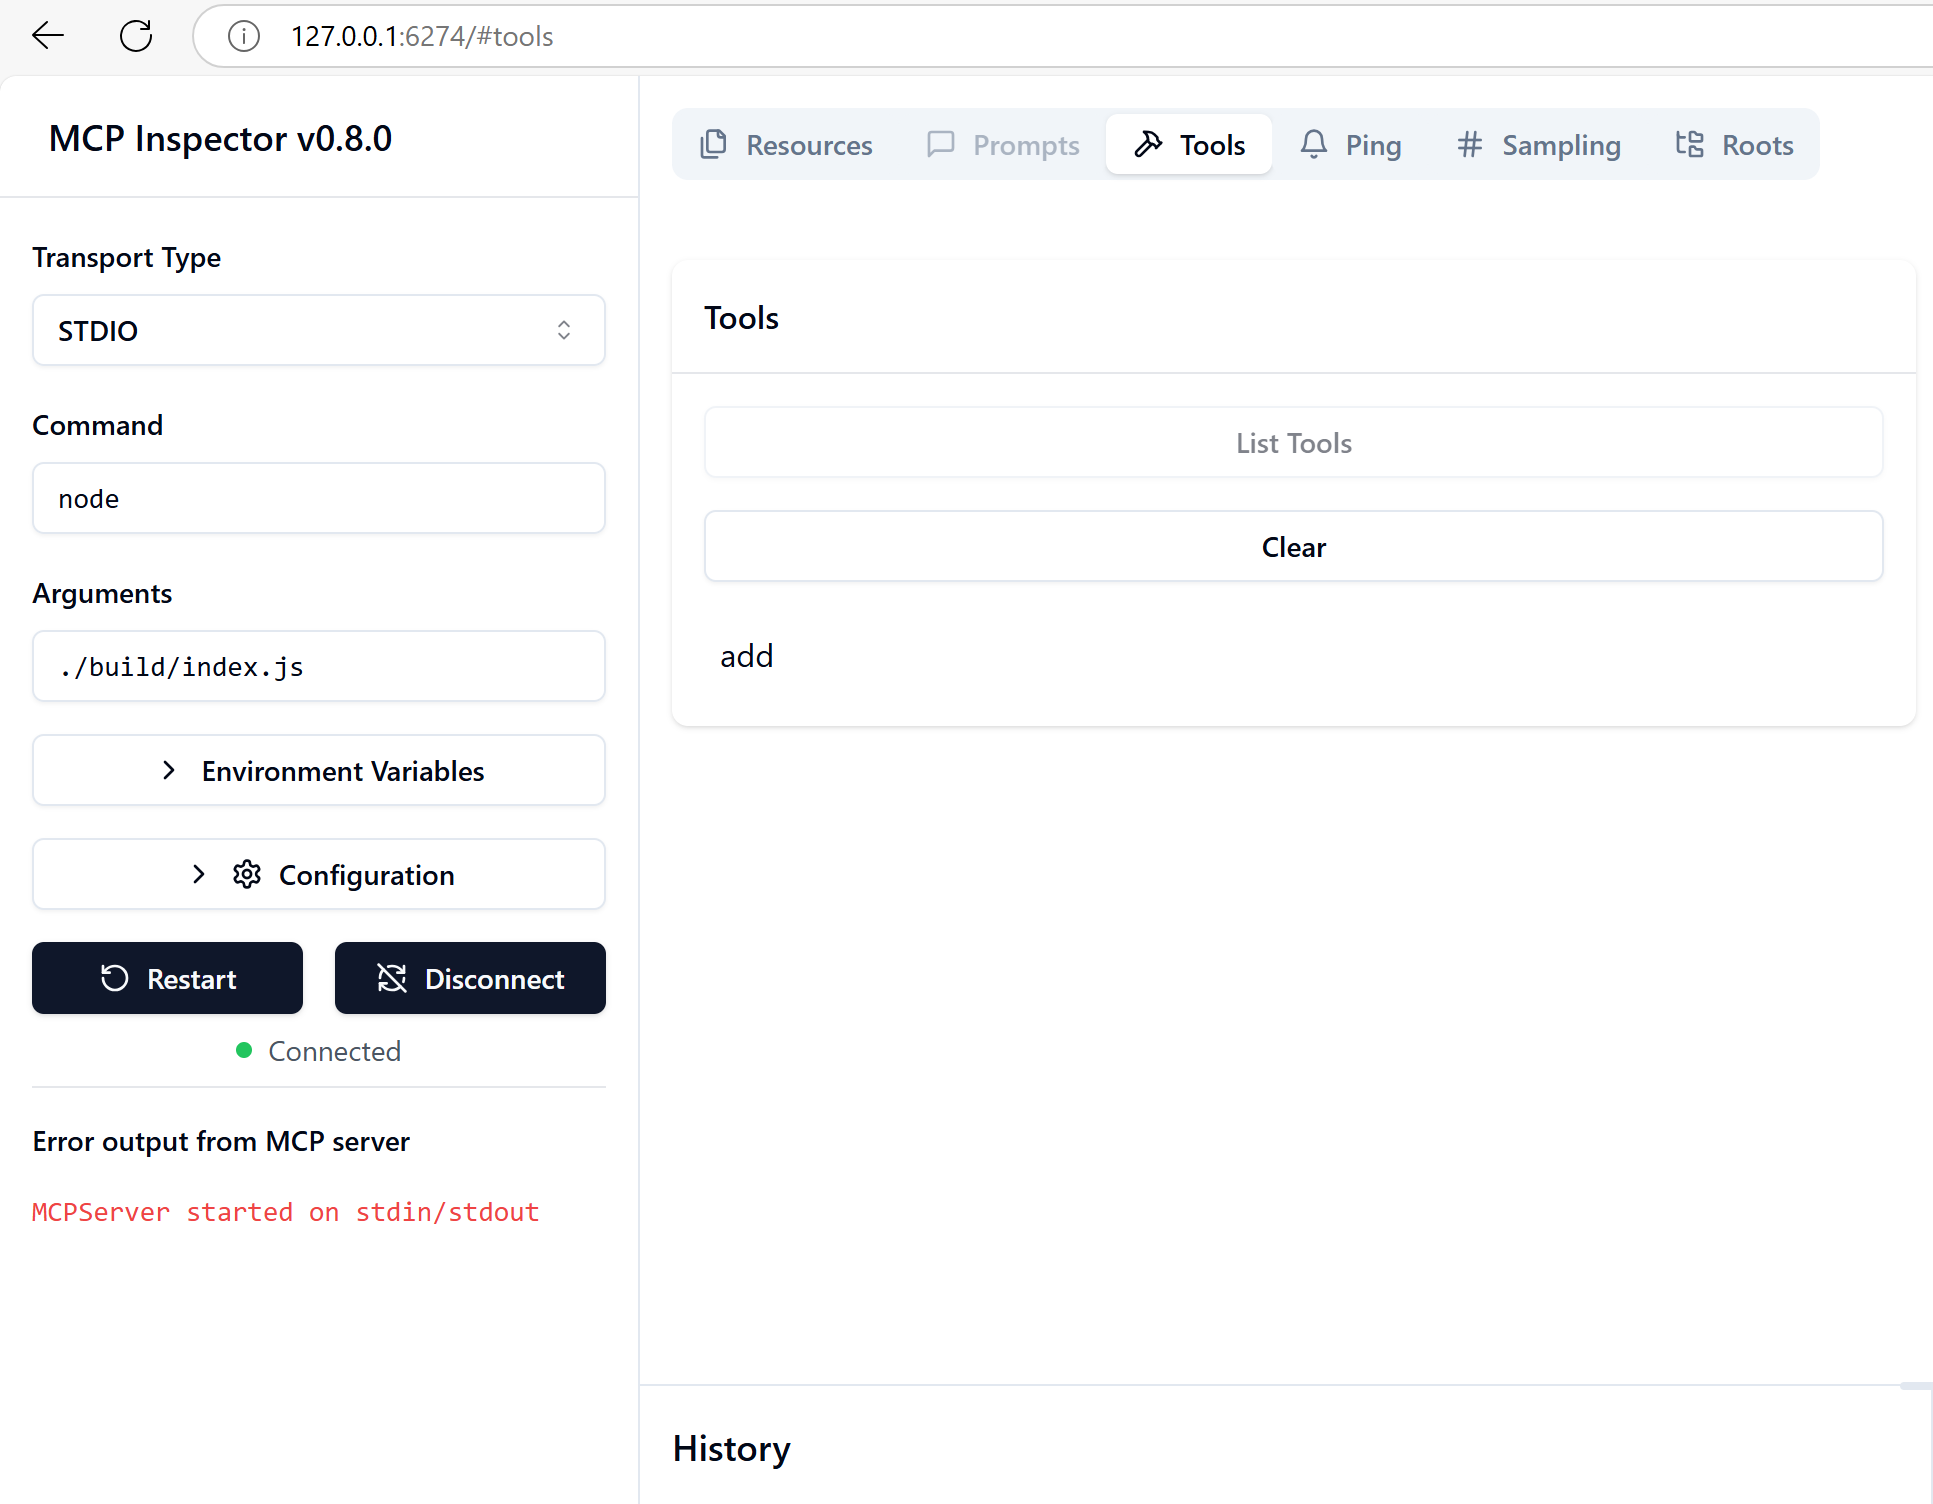
Select "List tools", to see what tools are available:
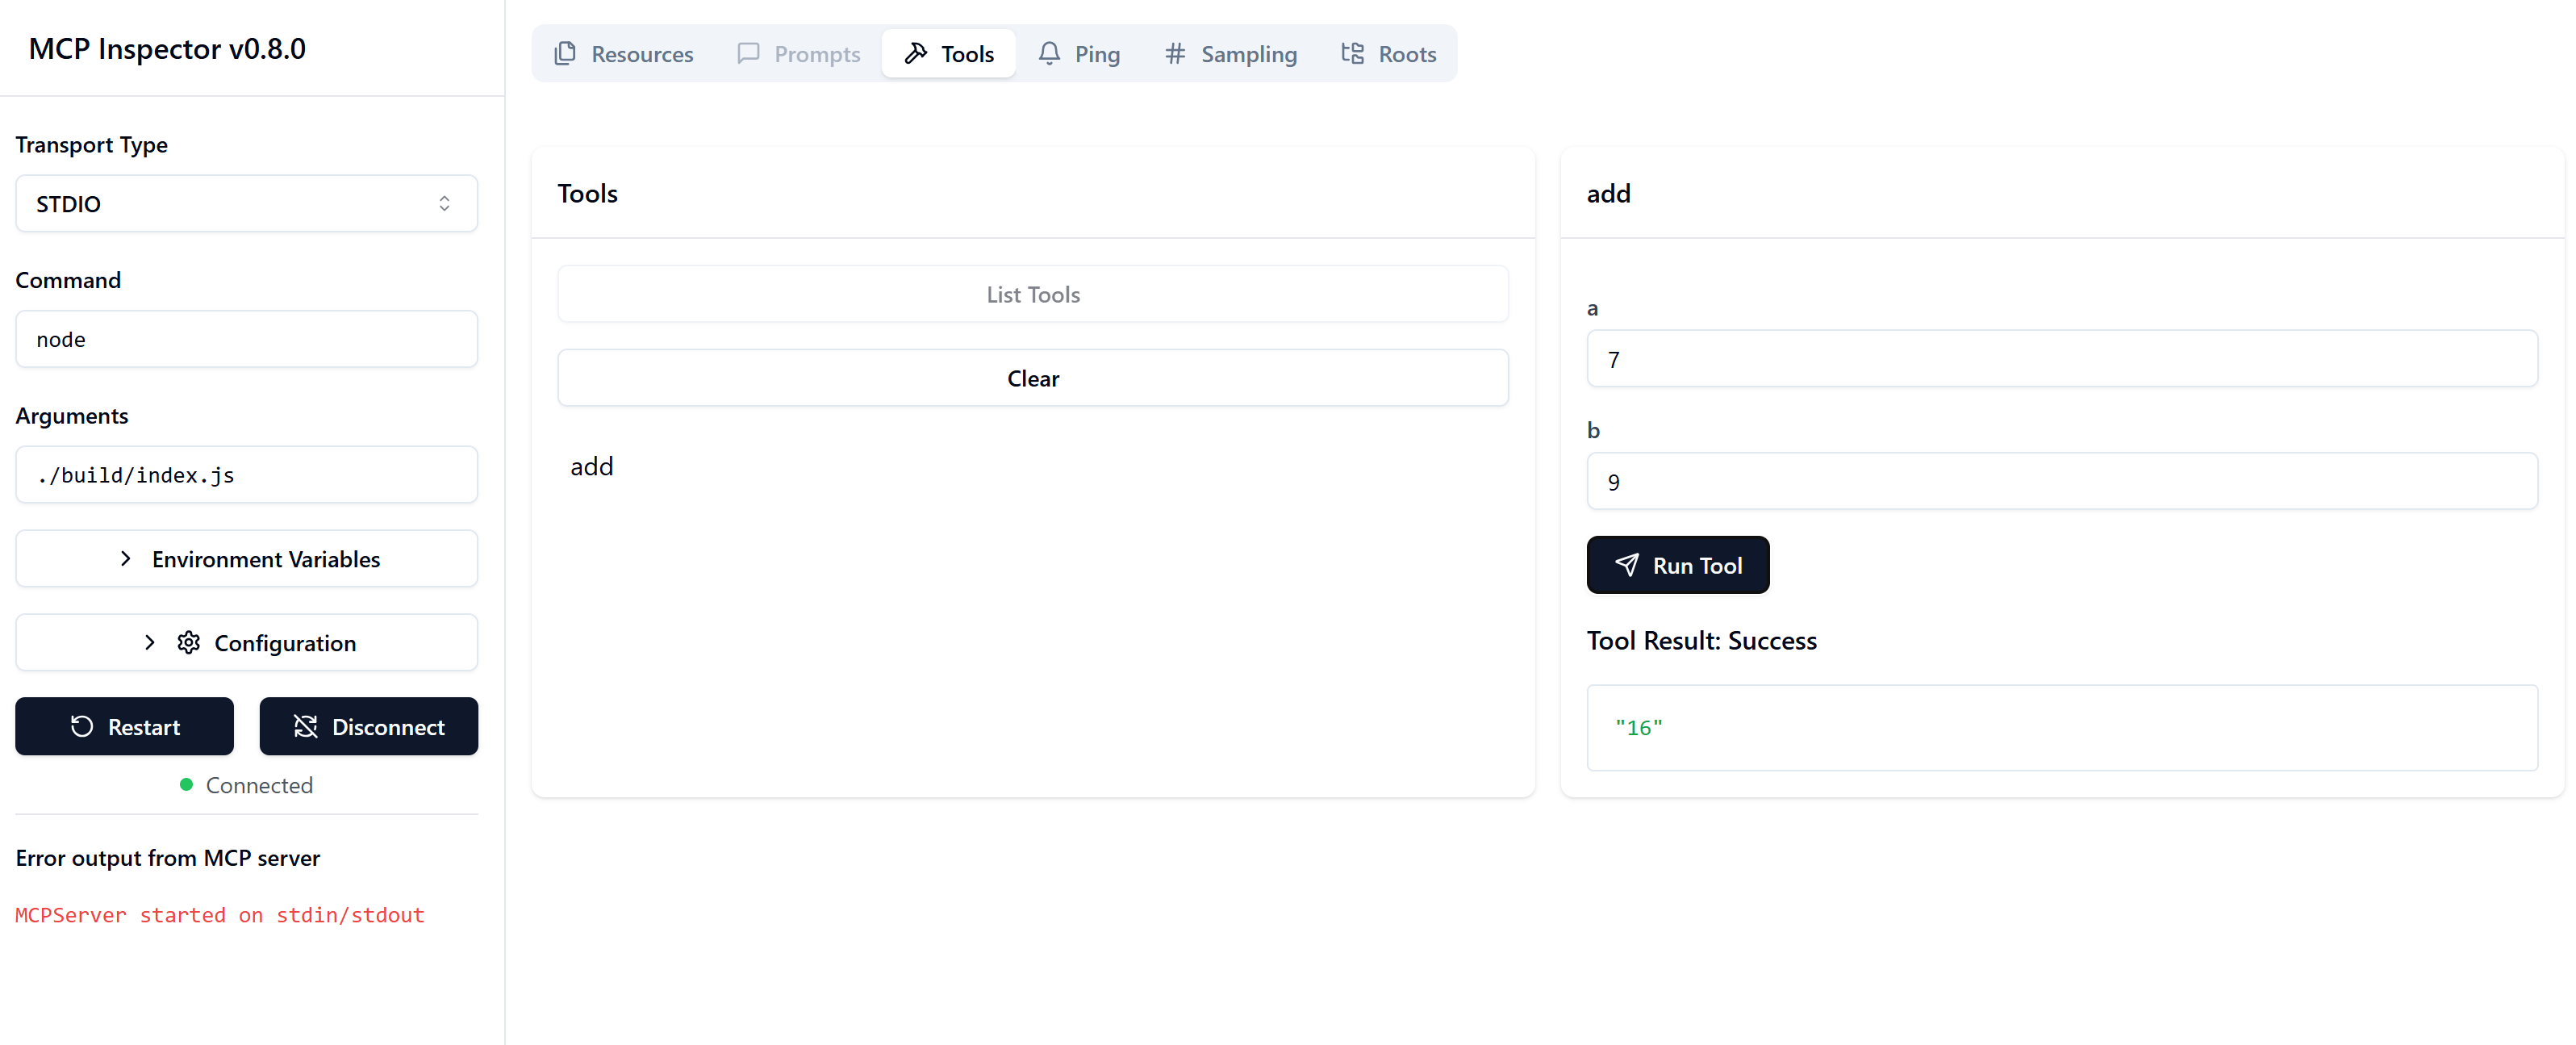
-3- Run the tool
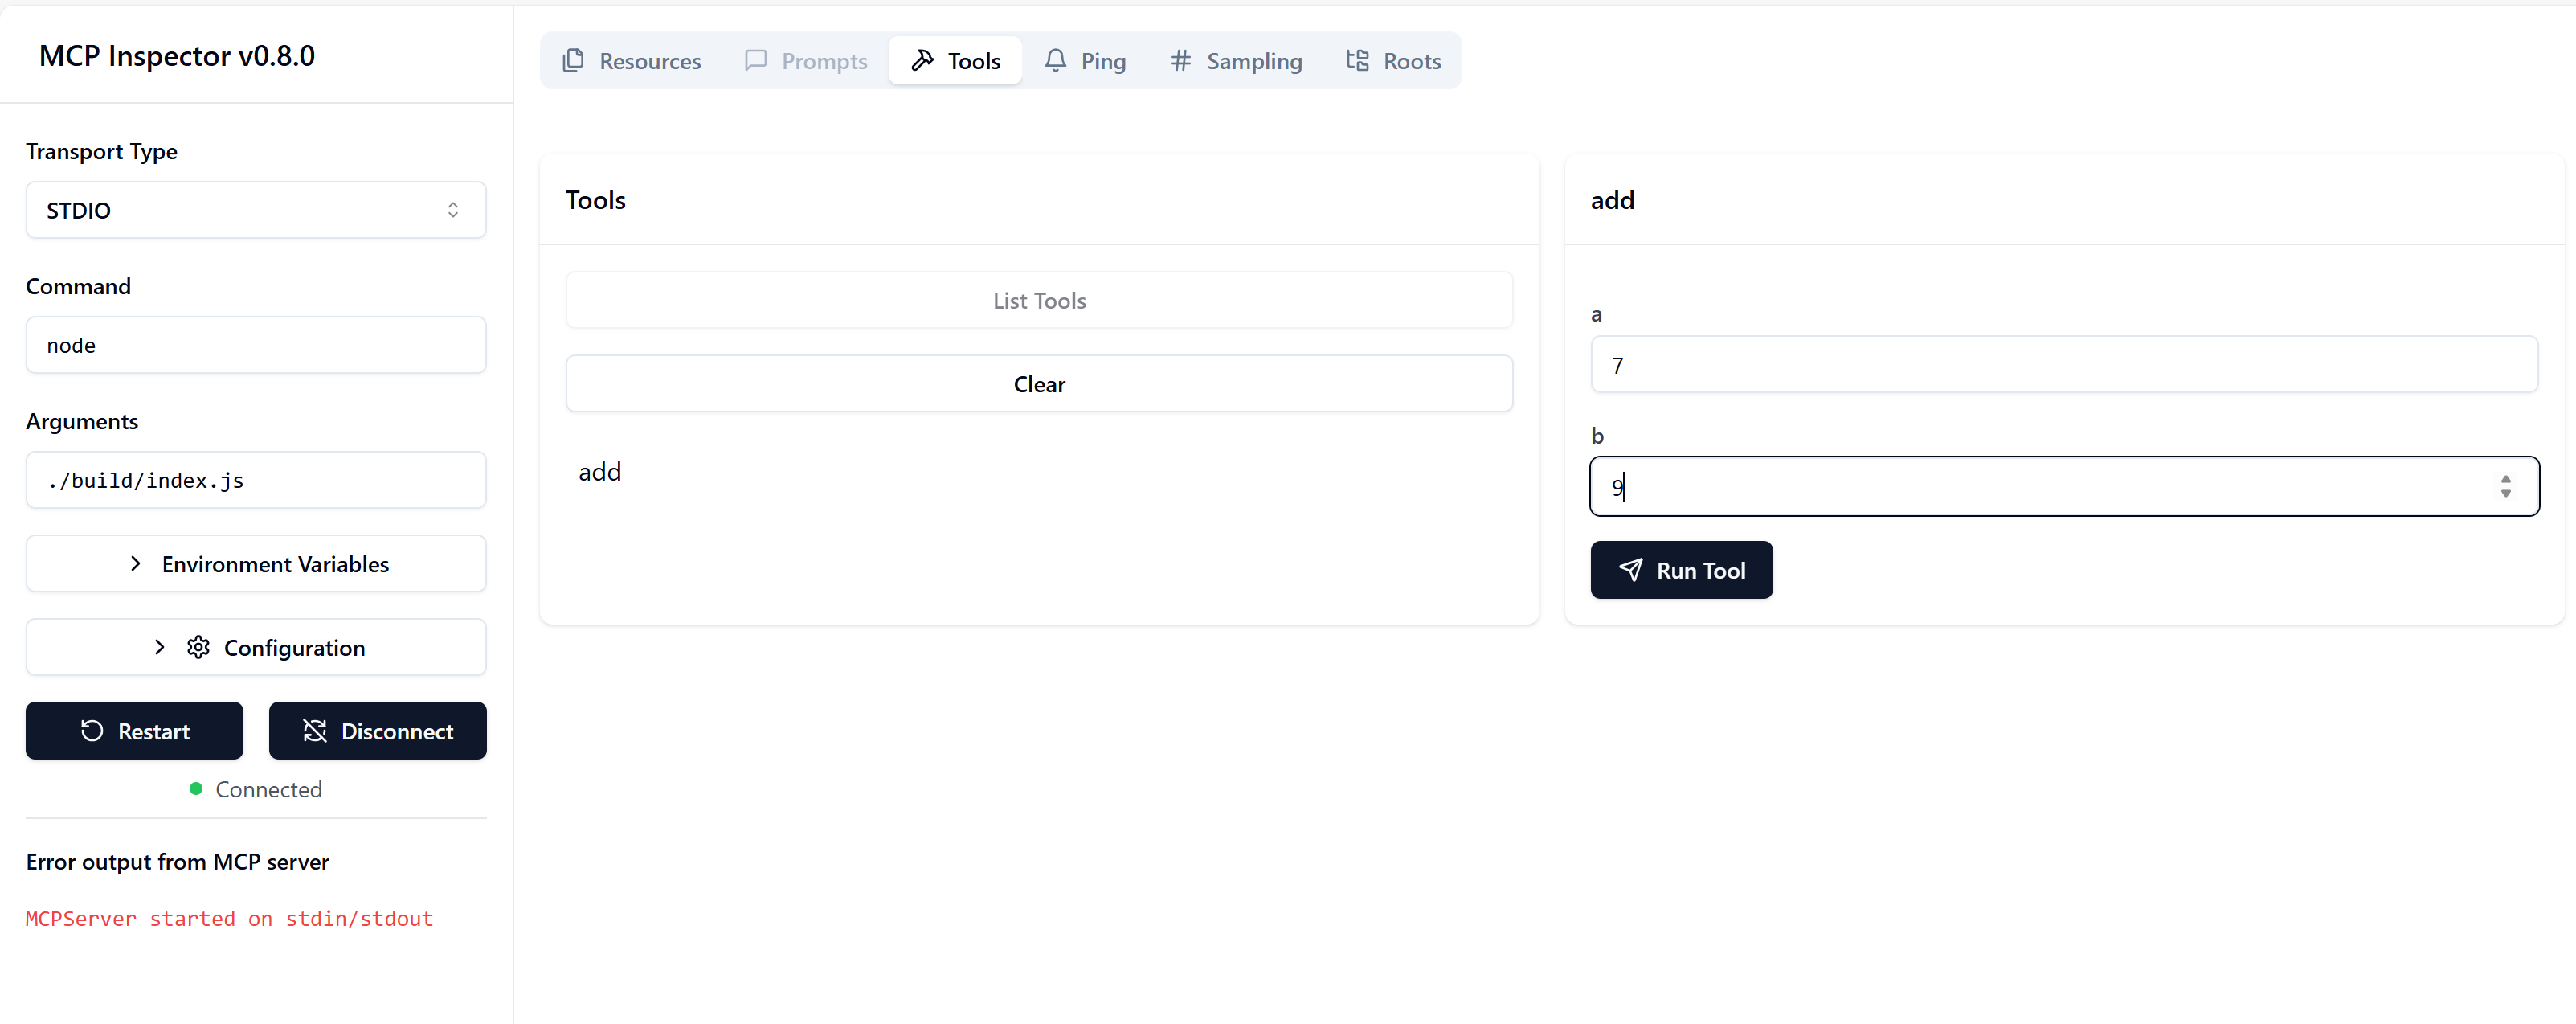
-
Select "add" and a dialog on your right will ask you to fill in the parameters:
-
You should see the result of the tool in the inspector, see 16 in the bottom result:
Congrats, you've managed to create a simple MCP server and run the inspector tool to test it!
You're ready for your next challenge, creating a client that can call the server and use the tools and resources you've created.
-4- Summary
You've learned to build a simple MCP Server and test it using the inspector tool. To look at a working solution you can clone the below:
git clone https://github.com/softchris/mcp-workshop-mcp.git
cd mcp-workshop